Procedure At A Glance
IHC (immunohistochemistry) is a tissue-staining technique that uses antibodies to detect specific proteins in fixed tissue sections, making it a cornerstone of modern hematopathology [1].
Total time: approximately 4–6 hours, excluding overnight incubation.
- Deparaffinize: Xylene (3 changes, 10 minutes each) → graded alcohols (100% to 50%) → water.
- Antigen retrieval: Heat slides in citrate buffer (pH 6.0) or EDTA (pH 9.0) using a pressure cooker or steamer (≈20 minutes). Cool to room temperature.
- Wash: PBS or TBS (3 changes, 5 minutes each).
- Endogenous peroxidase block: 3% hydrogen peroxide for 10–15 minutes (essential for heme samples).
- Protein block: Apply blocking buffer for 15–30 minutes.
- Primary antibody: Incubate overnight at 4 °C, or 1 hour at room temperature.
- Wash: PBS/TBS (3 changes).
- Secondary antibody (HRP polymer): 30–60 minutes at room temperature.
- Wash: PBS/TBS (3 changes).
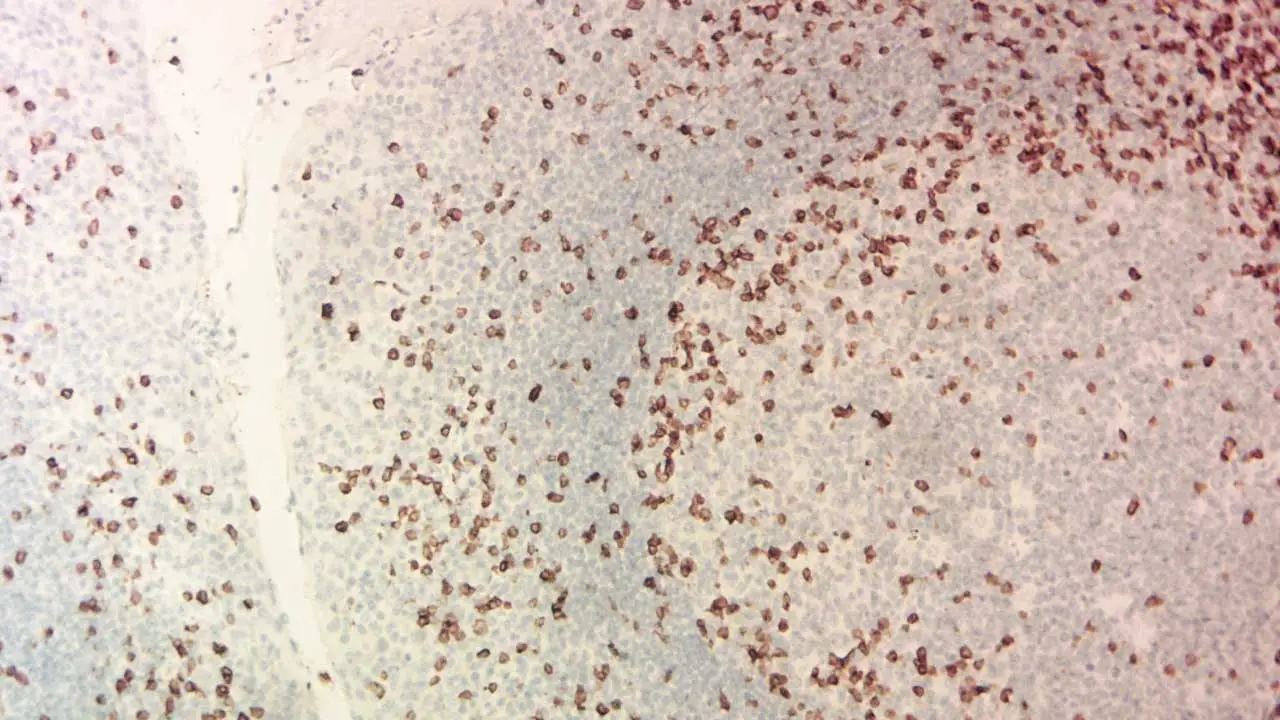
- Develop: DAB chromogen (5–10 minutes); watch for the brown reaction.
- Counterstain: Hematoxylin (1–2 minutes) → rinse → bluing reagent.
- Mount: Dehydrate in alcohols → clear in xylene → coverslip.
Introduction
If hematoxylin and eosin (H&E) staining shows the shape of cells, IHC shows the molecular identity of those cells. That difference is why IHC has become indispensable in hematopathology. A CD20 stain decides whether a B-cell lymphoma patient is a candidate for rituximab. A CD30 stain helps decide brentuximab vedotin eligibility (while classically used for Hodgkin lymphoma and anaplastic large cell lymphoma, CD30 expression is also increasingly evaluated in diffuse large B-cell lymphoma and other peripheral T-cell lymphomas to determine eligibility for targeted therapies) [9]. A CD138 stain confirms plasma cell origin in suspected myeloma. In each case, the answer starts with a brown dot under a microscope.
This article walks through the principle, materials, protocol, interpretation, and common diagnostic panels of IHC, with troubleshooting tips, an updated note on multiplex IHC, and references aligned with current WHO-HAEM5 (2022) classification [1].
Why IHC Matters in Hematopathology
IHC plays four overlapping roles in clinical hematology:
- Diagnosis. Distinguishing lymphomas from carcinomas or reactive processes often hinges on a small panel of markers. CD45 (positive in nearly all hematologic malignancies) and pan-cytokeratin (positive in carcinomas) is the classic first step [1].
- Subclassification. Within lymphomas, markers such as CD20, CD3, BCL2, CD5, CD10, and Cyclin D1 separate clinically distinct subtypes. The 5th edition of the WHO classification (WHO-HAEM5) and the International Consensus Classification (ICC) both organize these subtypes around immunophenotype as a primary feature [1,2].
- Prognosis. Proliferation markers like Ki-67 and abnormal protein expression patterns (for example, MYC and BCL2 co-expression in DLBCL) predict more aggressive disease.
- Mechanism. Visualizing protein distribution across a tissue helps researchers understand how lymphomagenesis and leukemogenesis unfold spatially.
Principle of Immunohistochemistry (IHC)
The IHC reaction has four conceptual steps.
1. Tissue preparation. Thin tissue sections are mounted on slides, paraffin is dissolved away, and antigen retrieval reverses the protein cross-links formed during formalin fixation. Without retrieval, most antigens stay "masked" and antibodies cannot bind [3].
2. The antibody hunt. A primary antibody, designed to recognize one specific protein, is applied to the tissue. It binds to its target like a key fitting a lock.
3. Signal amplification. A secondary antibody carrying an enzyme (most often horseradish peroxidase, HRP) binds to the primary. Because many secondaries can attach to one primary, the signal is amplified. Modern labs use polymer-based detection systems (such as EnVision, MACH, OptiView, or UltraView), where multiple HRP molecules are linked to a backbone polymer, giving very strong, biotin-free signals.
4. Visualization. A chromogen, usually DAB (3,3′-diaminobenzidine), is added. HRP converts DAB into a stable brown precipitate, marking the antigen's location. Alternatively, a fluorescent dye on the secondary antibody can be used, which is read under a fluorescence microscope.
A counterstain, typically hematoxylin, then colors the rest of the tissue blue so the brown signal stands out.
Antibody Types
Choosing the right antibody is the difference between a diagnostic slide and a messy one [3].
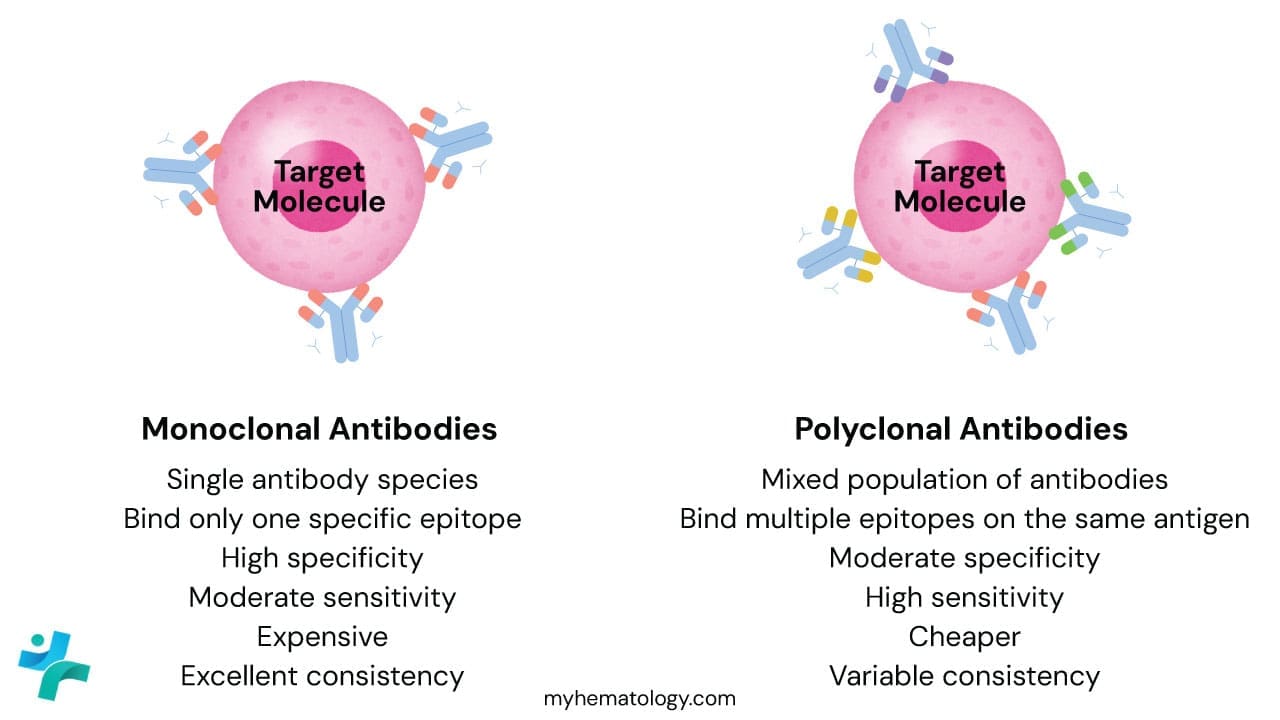
Monoclonal antibodies are produced from a single B-cell clone (via hybridoma technology). Every molecule is identical and recognizes the same epitope, the exact spot on the target.
- Advantage: High specificity. Clean slides with low background.
- Disadvantage: If that one epitope is damaged by formalin, the antibody fails to bind, giving a false negative.
- Example: The L26 clone, a monoclonal antibody used to detect CD20 in B-cell lymphomas.
Polyclonal antibodies are harvested from the serum of an immunized animal (rabbit or goat). They are a mixture of antibodies that bind different epitopes on the same target.
- Advantage: High sensitivity. If one epitope is damaged, others can still bind.
- Disadvantage: Higher background, since one antibody in the mix may cross-react.
- Example: Polyclonal rabbit anti-human myeloperoxidase (MPO) for myeloid cells in bone marrow.
Monoclonal vs. Polyclonal Comparison
| Feature | Monoclonal | Polyclonal |
|---|---|---|
| Source | Single B-cell clone (hybridoma) | Multiple clones (animal serum) |
| Epitope binding | One specific epitope | Multiple epitopes on the same antigen |
| Specificity | Very High | Low to Moderate |
| Sensitivity | Moderate | Very High |
| Batch consistency | Excellent | Variable |
| Cost | Higher | Generally Cheaper |
Direct vs. Indirect IHC
In direct IHC, the primary antibody itself carries the label. It is fast but produces a weaker signal because only one label binds per antigen.
In indirect IHC, the standard method, an unlabeled primary binds the antigen first, and a labeled secondary binds the primary. Multiple secondaries per primary mean a much stronger, easier-to-read signal.
Species of Origin
The species of the primary antibody (usually mouse or rabbit) decides the species of the secondary. A mouse primary needs a secondary antibody raised in a different species directed against mouse immunoglobulins (e.g., a goat anti-mouse or rabbit anti-mouse secondary), otherwise the stain will not develop.
Manual vs. Automated Staining
Manual staining gives the highest control on a single slide, but automated platforms (Ventana BenchMark, Leica Bond, Dako Omnis) have become the gold standard in clinical hematology labs. The biggest gain is standardization: many heme markers (BCL-2, Cyclin D1, Ki-67) are interpreted by intensity thresholds that only a machine can reproduce day after day.
Materials
This protocol is a general guideline. Adapt it to specific antibodies, tissues, and detection methods, and always follow the manufacturer's datasheets.
- Tissue sections on positively charged slides
- Xylene
- Ethanol solutions (100%, 95%, 70%, 50%)
- Deionized water
- Antigen retrieval buffer (citrate pH 6.0 or EDTA pH 9.0)
- 3% hydrogen peroxide solution (endogenous peroxidase block)
- Protein blocking buffer (1% BSA in PBS, or 5% serum from the secondary host species)
- Primary antibody (concentration per datasheet)
- HRP-polymer secondary detection system
- DAB chromogen kit (or fluorescent mounting medium for fluorescent IHC)
- Hematoxylin (counterstain), bluing reagent
- Coplin jars or staining dishes, humidity chamber, coverslips
- Pipettes, forceps, lint-free wipes
- Wash buffer (PBS or TBS)
- Waste containers for xylene and chromogen
Protocol
- Deparaffinization and rehydration. Xylene 10 minutes (×3) → 100% ethanol 5 minutes (×2) → 95%, 70%, 50% ethanol 2 minutes each → rinse in deionized water.
- Antigen retrieval. Heat slides in retrieval buffer (citrate pH 6.0 or EDTA pH 9.0) per antibody datasheet. Cool gradually, then rinse.
- Endogenous peroxidase block. Incubate slides in 3% hydrogen peroxide for 10–15 minutes. This step is critical for heme tissues, where red cells and granulocytes carry abundant endogenous peroxidase that would otherwise produce a false-positive brown signal. [Note: Depending on the specific laboratory protocol and automation platform, this H₂O₂ blocking step may alternatively be performed before antigen retrieval or even after primary antibody incubation.]
- Protein block. Incubate in blocking buffer for 15–30 minutes at room temperature.
- Primary antibody. Apply diluted primary antibody, cover with a plastic coverslip to prevent drying, and incubate in a humidified chamber (overnight at 4 °C, or 1 hour at room temperature).
- Wash. PBS or TBS, 3 × 5 minutes.
- Secondary antibody (HRP-polymer system). Apply for 30–60 minutes at room temperature; keep slides shielded if a fluorescent label is used.
- Wash. PBS or TBS, 3 × 5 minutes.
- Detection.
- Chromogenic (HRP/DAB): Apply DAB substrate for 5–10 minutes. Watch for brown precipitate. Rinse with deionized water to stop the reaction.
- Fluorescent: Rinse and mount with fluorescent mounting medium.
- Counterstain and mount. Hematoxylin 1–2 minutes → rinse → bluing reagent → dehydrate (graded alcohols) → clear (xylene) → coverslip with permanent mounting medium.
- Examine. Read slides under a light microscope (or fluorescence microscope, as applicable).
A note on terminology
Older articles sometimes refer to "ADEC" or biotin-streptavidin (LSAB) systems. Modern hematology labs have largely moved to polymer detection systems, which provide stronger signal, lower background, and are unaffected by endogenous biotin in tissues such as liver and kidney.
Interpretation
Reading an IHC slide is part technical, part contextual. Three things matter: pattern, intensity, and controls.
Staining Patterns
The location of the brown signal carries diagnostic meaning:
- Membranous: The outline of the cell is stained (e.g., CD20 in B-cells).
- Cytoplasmic: The signal fills the cell body (e.g., MPO in granulocytes).
- Nuclear: The signal is restricted to the nucleus (e.g., Ki-67, TdT, Cyclin D1).
- Focal: Patchy positivity in clusters of cells.
- Negative: No staining; the antigen is absent or below the detection threshold.
Staining Intensity
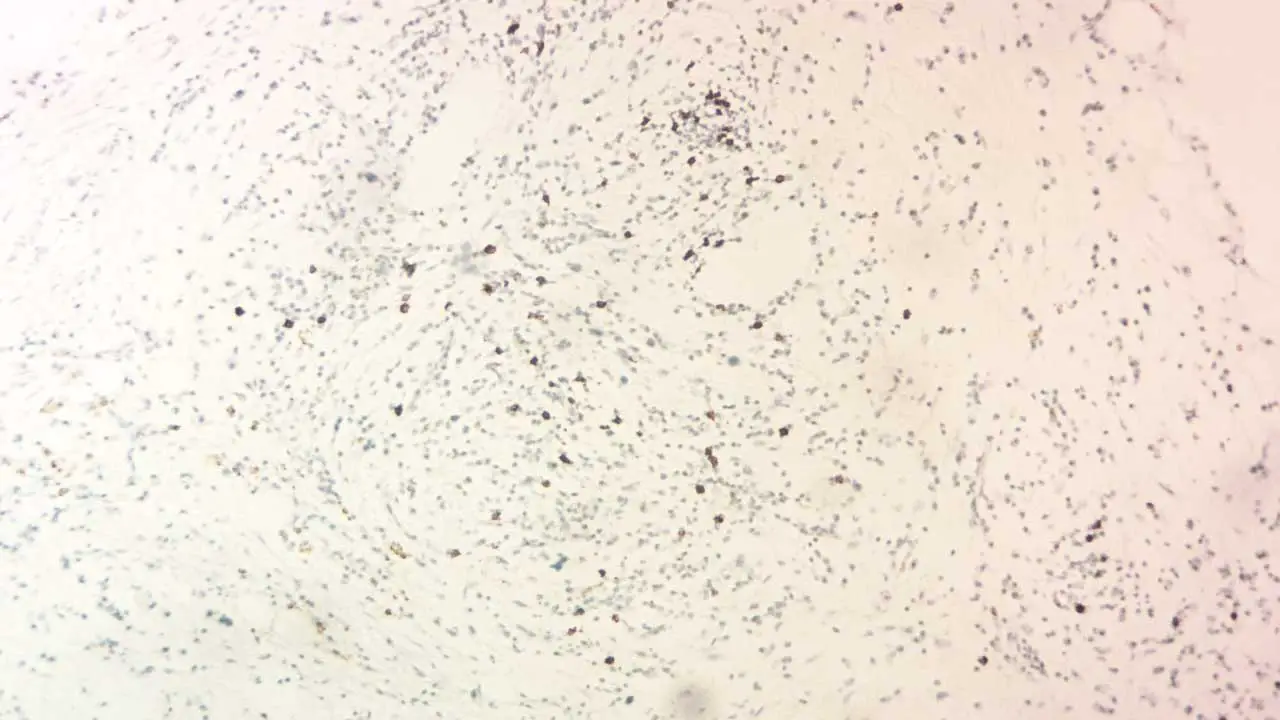
Intensity reflects relative antigen abundance. Most labs grade it as negative, weak, moderate, or strong. For markers like Ki-67, intensity is replaced by the percentage of positively stained nuclei.
Positive vs. Negative Controls in IHC staining
Every IHC run must include both:
- Positive control: A tissue known to express the antigen. If this is negative, the run failed.
- Negative control: A serial section either omitting the primary antibody or using non-immune serum. If this shows brown staining, there is background you cannot trust [3,7].
A patient slide is only interpretable when both controls behave as expected.
Tissue Specificity
Some antigens are normally expressed in certain cells in the tissue (for example, scattered T-cells in any reactive lymph node will be CD3 positive). Always read the staining pattern in the context of normal tissue architecture before calling a finding abnormal.
Common IHC Panels in Hematology
Diagnostic hematopathology rarely uses a single antibody. Panels combine antibodies that, taken together, separate one disease from another. The panels below align with the WHO-HAEM5 (2022) and ICC 2022 frameworks [1,2].
The Screening Panel
Scenario: An enlarged lymph node with abnormal cells. Is this a lymphoma, a metastatic carcinoma, or something else?
Mature Lymphoma Panel
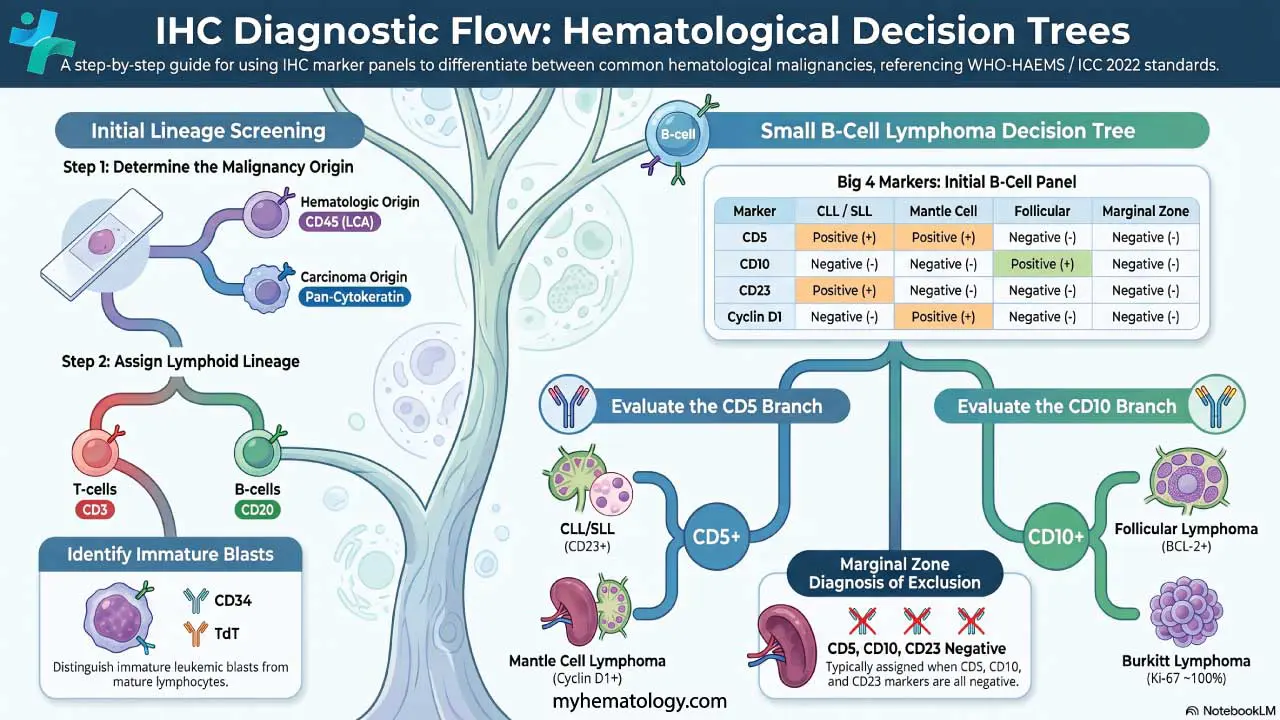
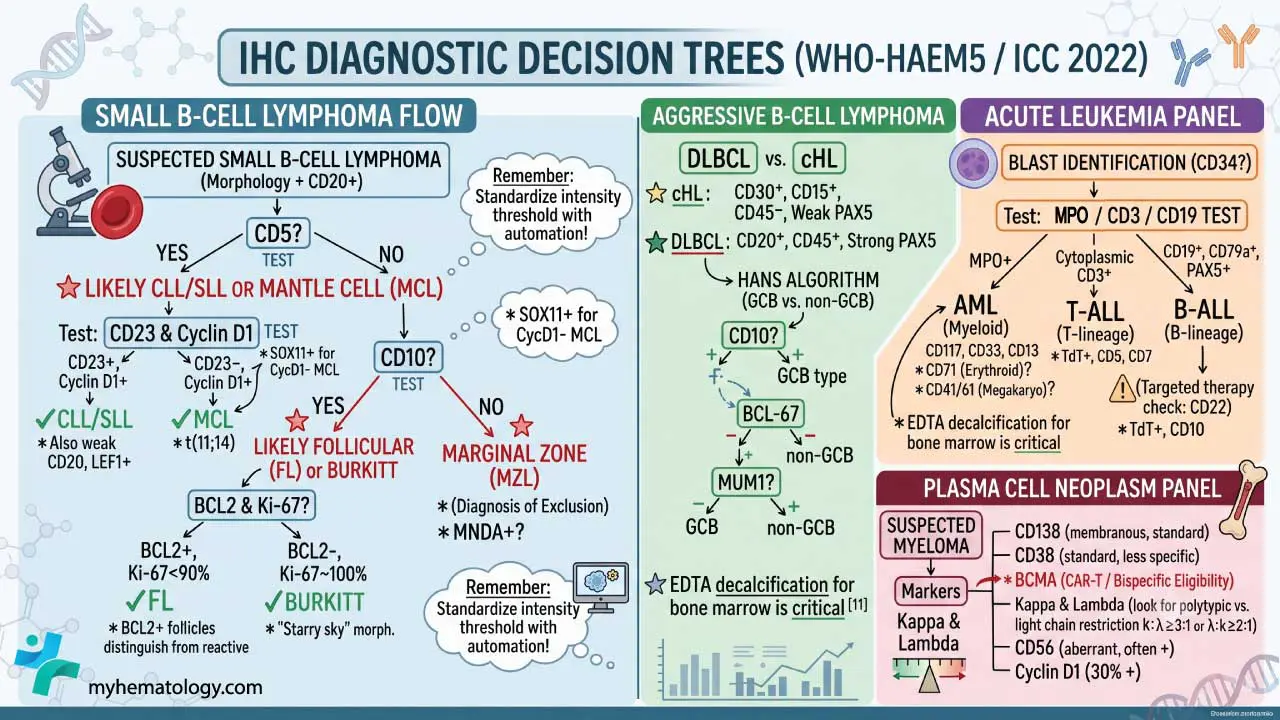
A practical decision flow for small B-cell lymphomas [1]:
- CD5 positive?
- Yes → likely CLL/SLL or Mantle Cell Lymphoma. Differentiate using CD23 (CLL +, MCL −) and Cyclin D1 (CLL −, MCL +).
- No → check CD10.
- CD10 positive?
- Yes → likely Follicular Lymphoma or Burkitt Lymphoma. Differentiate with BCL-2 (FL +, Burkitt −) and Ki-67 (Burkitt ~100%).
- No → likely Marginal Zone Lymphoma (a diagnosis of exclusion).
For aggressive lymphomas, the central question is DLBCL versus classical Hodgkin lymphoma:
Once DLBCL is confirmed, the Hans algorithm (CD10, BCL-6, MUM1) classifies it as germinal center B-cell (GCB) type or non-GCB type, with prognostic implications [1].
Acute Leukemia Panel (Blast Identification)
Scenario: A bone marrow biopsy packed with immature blasts. Is this AML or ALL?
- General blast marker: CD34 (not all leukemias express it).
- Myeloid (AML): MPO (most specific), CD117, CD13, CD33; CD68/CD163 for monocytic differentiation; CD71 for erythroid lineage; and CD41 or CD61 for megakaryoblastic differentiation.
- B-ALL: TdT, CD19, CD22 (a major therapeutic target for agents like inotuzumab ozogamicin), CD79a, CD10, PAX5 [10].
- T-ALL: TdT, cytoplasmic CD3, CD5, CD7.
Plasma Cell Neoplasm Panel
Scenario: High serum protein or lytic bone lesions; suspected myeloma.
- CD138 (syndecan-1): Gold-standard plasma cell marker; strong membranous staining.
- BCMA (B-cell maturation antigen): Increasingly critical for evaluating patient eligibility for CAR-T cell therapies and bispecific antibodies in multiple myeloma [11].
- CD38: Also stains plasma cells, less specific.
- Kappa and lambda light chains: Normal plasma cells show a polytypic mix; myeloma cells are light-chain restricted (e.g., all kappa or all lambda).
- Aberrant markers: CD56 (often positive in myeloma, negative in normal plasma cells); Cyclin D1 (positive in ≈30% of myeloma, often associated with t(11;14)).
Lymphoma Subtype Quick-Reference
| Category | Subtype | Positive markers | Negative markers | Clinical key |
|---|---|---|---|---|
| Small B-cell | CLL/SLL | CD5, CD23, weak CD20, LEF1 | Cyclin D1, CD10 | LEF1 is the most specific nuclear marker for CLL |
| Mantle cell (MCL) | CD5, CD20, Cyclin D1, SOX11 | CD23, CD10 | t(11;14) drives Cyclin D1 | |
| Follicular (FL) | CD10, BCL2, BCL6, CD20 | CD5, CD23 | BCL2-positive follicles distinguish from reactive | |
| Marginal zone (MZL) | CD20, BCL2, MNDA | CD5, CD10, CD23 | Diagnosis of exclusion | |
| Large B-cell | DLBCL | CD20, PAX5, BCL6 (±) | CD3 (in tumor cells) | Use Hans algorithm for subtyping |
| Burkitt | CD10, BCL6, MYC, Ki-67 ≈100% | BCL2 | "Starry sky" morphology, very high Ki-67 | |
| T-cell | PTCL, NOS | CD3, CD2, CD5, CD4 (>CD8) | CD20 | Often shows aberrant loss of pan-T markers |
| ALCL | CD30 (strong), ALK (±), EMA | CD3 (often) | Hallmark cells are uniformly strong CD30 | |
| NK/T-cell (nasal) | Cytoplasmic CD3, CD56, EBER, TIA-1 | CD20 | EBV (EBER ISH) is mandatory | |
| Hodgkin | Classical HL | CD30, CD15, weak PAX5 | CD45, CD3, CD20 (usually) | Reed-Sternberg cells are CD45 negative |
| NLPHL | CD20, CD45, OCT2, BOB.1 | CD30, CD15 | "Popcorn" cells stain like mature B-cells | |
| Plasma cell | Myeloma | CD138, CD38, CD56, kappa/lambda | CD20, CD45 | Look for light chain restriction (≥3:1 ratio) |
Niche Markers Worth Knowing
- SOX11: Specific for Cyclin D1-negative mantle cell lymphoma.
- TdT: The defining marker of lymphoblastic neoplasms.
- Annexin A1 / BRAF V600E: Confirm hairy cell leukemia.
- BCL-2: Inside germinal centers, points to follicular lymphoma; reactive germinal centers are BCL-2 negative.
Modern Advances in IHC
IHC is no longer a single-marker, single-slide technique. Three developments are reshaping the field.
Multiplex IHC (mIHC). This approach detects several proteins on one tissue section using multiple chromogens or fluorescent dyes, often combined with tyramide signal amplification to overcome same-species antibody clashes [4,5]. This technology enables spatial phenotyping—understanding, for instance, whether cytotoxic T-cells are actively infiltrating the tumor nest or excluded in the surrounding stroma, which is a crucial biomarker for predicting response to immune checkpoint inhibitors [5]. mIHC saves precious tissue, captures cellular spatial relationships (especially in the tumor microenvironment), and is increasingly used in immuno-oncology research [6]. The Society for Immunotherapy of Cancer published a best-practice statement on mIHC validation in 2020 [4].
Digital pathology and AI-assisted scoring. Whole-slide imaging and computational image analysis now allow quantitative scoring of markers like Ki-67, PD-L1, and HER2 with reduced inter-observer variability. Several FDA-cleared algorithms are already in routine clinical use.
Quality assurance frameworks. External programs such as NordiQC, UK NEQAS-ICC, and the CAP IHC Survey define what a well-stained slide looks like worldwide. CAP guidelines on IHC analytical validation provide the standards labs use to validate every new antibody before clinical use [7].
Pre-Analytical Variables That Make or Break IHC
Before the first reagent ever touches a slide, three factors decide whether IHC will work:
- Cold ischemic time: The interval between specimen removal and fixation. Long delays degrade antigens.
- Fixation duration: Most heme tissues do best with 6–24 hours in 10% neutral buffered formalin. Under-fixation gives poor morphology; over-fixation masks antigens beyond what retrieval can recover.
- Decalcification: Bone marrow biopsies must be decalcified, and the choice of agent matters. EDTA decalcification is preferred for IHC because it preserves antigens; strong acid decalcifiers (nitric acid, RDO) destroy delicate antigens including TdT, CD30, and Cyclin D1. Formic acid is sometimes used as an acceptable middle-ground decalcifier; it is faster than EDTA and less destructive than nitric acid, though EDTA remains the absolute gold standard for preserving IHC and molecular integrity [12].
Troubleshooting
The first rule of IHC troubleshooting is also the simplest: always check your controls before blaming the antibody.
Scenario A: No staining at all
The slide is blue from hematoxylin, with no brown chromogen anywhere.
| Possible Cause | Solution |
|---|---|
| Missed step (no primary applied) | Re-check pipetting order |
| Mismatched secondary | Confirm species: anti-mouse secondary for mouse primary, anti-rabbit for rabbit primary |
| Sodium azide in buffer | Azide destroys HRP; use azide-free buffers |
| Oxidized DAB | If DAB browned in the tube, mix fresh DAB |
| Antigen retrieval failure | Try EDTA pH 9.0 if citrate pH 6.0 fails, or extend retrieval time |
Scenario B: High Background (The "Dirty" Slide)
The whole tissue is covered in a brown haze, making it hard to see specific cells.
| Possible Cause | Solution |
|---|---|
| Endogenous peroxidase | Critical for heme: block with 3% H₂O₂ for 10–15 minutes before primary |
| Inadequate protein blocking | Use BSA or serum from secondary host species, 30 minutes |
| Primary too concentrated | Titrate (e.g., 1:100, 1:200, 1:500) |
| Tissue dried during run | Use a humidity chamber; watch for edge effect |
| Residual paraffin | Refresh xylene and alcohols regularly |
Scenario C: Weak or Patchy Staining
The signal is there, but it is too faint to be diagnostic.
| Possible Cause | Solution |
|---|---|
| Over-fixation | More aggressive retrieval (longer heat, higher pH) |
| Acid decalcification | Switch to EDTA for bone marrow biopsies |
| Old reagents | Store concentrated antibody at 4 °C or −20 °C; dilute only what is needed |
| Short incubation | Extend primary to overnight at 4 °C |
Hematology-Specific Pitfalls
Crush artifact in lymph nodes. Fragile nodes smear when handled with forceps. Smeared DNA picks up nuclear stains (Ki-67, BCL-6) and creates false positives. Read intact areas of the section.
Decalcification damage in bone marrow. Acid-decalcified marrow biopsies often give false-negative results for nuclear markers (TdT, PAX5, Cyclin D1). If suspected, use a polyclonal antibody (multiple epitopes) or confirm by flow cytometry.
Edge artifact in needle cores. Needle biopsy edges often stain falsely positive due to mechanical damage and drying. Read the center of the core, not the edges.
Frequently Asked Questions (FAQs)
What are the two main types of IHC?
Chromogenic IHC uses an enzyme (typically HRP) that converts a substrate into a colored deposit, viewed under a light microscope. Fluorescent IHC uses antibodies labeled with fluorescent dyes, viewed under a fluorescence microscope; this method is well suited to multiplex detection.
What are the most common IHC stains?
The most common chromogen is DAB (brown). Others include AEC (red, often paired with DAB for double staining) and alkaline phosphatase substrates like BCIP/NBT (blue/purple). Common antigens stained in routine practice include Ki-67 (proliferation), CD3 (T-cells), CD20 (B-cells), CD138 (plasma cells), ER and PR (breast cancer), HER2 (breast/gastric cancer), and cytokeratins (epithelial cells).
Why do I need to perform antigen retrieval?
Formalin preserves tissue by cross-linking proteins, which also masks antigens. Heat-induced retrieval in citrate (pH 6.0) or EDTA (pH 9.0) breaks these cross-links and exposes the epitope so the antibody can bind.
What is the difference between direct and indirect IHC?
In direct IHC, the primary antibody itself is labeled. It is fast but produces a weak signal. In indirect IHC (the standard), an unlabeled primary binds first, then a labeled secondary binds the primary. Multiple secondaries per primary amplify the signal substantially.
Why is my IHC negative control showing positive staining?
Common causes include incomplete blocking of endogenous peroxidase, primary or secondary antibody concentrations that are too high, slide drying during the run, or inadequate washing between steps.
Can IHC be performed on frozen tissue sections?
Yes. Cryosections skip formalin fixation, so antigen retrieval is usually unnecessary, and antigen preservation can be excellent. The trade-off is poorer morphology; FFPE remains the routine choice for diagnostic hematopathology.
How long can cut slides be stored before staining?
It is best to stain immediately. Cut slides can be stored at 4 °C for several weeks, but over months antigens (especially nuclear markers like Ki-67 and p53) oxidize and signal weakens. Paraffin dip-coating extends shelf life.
Glossary of Related Medical Terms
- Antibody (immunoglobulin): Y-shaped protein produced by the immune system that binds one specific target. The detection tool of IHC.
- Antigen: Any molecule (usually a protein) recognized by an antibody. The target of the IHC stain.
- Antigen retrieval (epitope retrieval): A heat or enzyme step that reverses formalin cross-links and re-exposes antigens.
- Chromogen: A colorless substrate (commonly DAB) that becomes a colored precipitate when an enzyme acts on it.
- Counterstain: A second stain (usually hematoxylin) that gives the rest of the tissue a contrasting color.
- Deparaffinization: Removing paraffin wax from tissue sections using xylene before staining begins.
- Endogenous peroxidase: Naturally occurring peroxidase in red cells and granulocytes that can mimic the IHC enzyme reaction; blocked with 3% H₂O₂.
- Epitope: The exact region of an antigen that an antibody binds.
- HRP (horseradish peroxidase): The enzyme most often attached to detection antibodies in chromogenic IHC.
- Multiplex IHC (mIHC): A technique that detects several proteins on a single tissue section.
- Polymer detection system: A modern detection method that links many HRP molecules to a polymer backbone for stronger, biotin-free signal.
- Primary antibody: The first antibody applied; binds the target antigen.
- Secondary antibody: A labeled antibody that binds the primary antibody and produces the visible signal.
- Tyramide signal amplification (TSA): A chemical amplification step common in multiplex IHC.
Disclaimer: This protocol is for educational purposes only. Local laboratory standard operating procedures take precedence. It is not intended to be a substitute for informed professional medical advice, diagnosis, or treatment. Always consult a qualified healthcare professional for clinical decision-making. While the information presented here is derived from credible medical sources and is believed to be accurate and up-to-date, it is not guaranteed to be complete or error-free. See additional information.
References
- Alaggio, R., Amador, C., Anagnostopoulos, I., Attygalle, A. D., Araujo, I. B. O., Berti, E., Bhagat, G., Borges, A. M., Boyer, D., Calaminici, M., Chadburn, A., Chan, J. K. C., Cheuk, W., Chng, W. J., Choi, J. K., Chuang, S. S., Coupland, S. E., Czader, M., Dave, S. S., de Jong, D., … Xiao, W. (2022). The 5th edition of the World Health Organization Classification of Haematolymphoid Tumours: Lymphoid Neoplasms. Leukemia, 36(7), 1720–1748. https://doi.org/10.1038/s41375-022-01620-2
- Campo, E., Jaffe, E. S., Cook, J. R., Quintanilla-Martinez, L., Swerdlow, S. H., Anderson, K. C., Brousset, P., Cerroni, L., de Leval, L., Dirnhofer, S., Dogan, A., Feldman, A. L., Fend, F., Friedberg, J. W., Gaulard, P., Ghia, P., Horwitz, S. M., King, R. L., Salles, G., San-Miguel, J., … Zelenetz, A. D. (2022). The International Consensus Classification of Mature Lymphoid Neoplasms: a report from the Clinical Advisory Committee. Blood, 140(11), 1229–1253. https://doi.org/10.1182/blood.2022015851
- Kim, S. W., Roh, J., & Park, C. S. (2016). Immunohistochemistry for Pathologists: Protocols, Pitfalls, and Tips. Journal of pathology and translational medicine, 50(6), 411–418. https://doi.org/10.4132/jptm.2016.08.08
- Taube, J. M., Akturk, G., Angelo, M., Engle, E. L., Gnjatic, S., Greenbaum, S., Greenwald, N. F., Hedvat, C. V., Hollmann, T. J., Juco, J., Parra, E. R., Rebelatto, M. C., Rimm, D. L., Rodriguez-Canales, J., Schalper, K. A., Stack, E. C., Ferreira, C. S., Korski, K., Lako, A., Rodig, S. J., … Society for Immunotherapy of Cancer (SITC) Pathology Task Force. (2020). The Society for Immunotherapy of Cancer statement on best practices for multiplex immunohistochemistry (IHC) and immunofluorescence (IF) staining and validation. Journal for immunotherapy of cancer, 8(1), e000155. https://doi.org/10.1136/jitc-2019-000155
- Tan, W. C. C., Nerurkar, S. N., Cai, H. Y., Ng, H. H. M., Wu, D., Wee, Y. T. F., Lim, J. C. T., Yeong, J., & Lim, T. K. H. (2020). Overview of multiplex immunohistochemistry/immunofluorescence techniques in the era of cancer immunotherapy. Cancer communications (London, England), 40(4), 135–153. https://doi.org/10.1002/cac2.12023
- Sun, A. K., Fan, S., & Choi, S. W. (2025). Exploring Multiplex Immunohistochemistry (mIHC) Techniques and Histopathology Image Analysis: Current Practice and Potential for Clinical Incorporation. Cancer medicine, 14(1), e70523. https://doi.org/10.1002/cam4.70523
- Torlakovic, E. E., Cheung, C. C., D'Arrigo, C., Dietel, M., Francis, G. D., Gilks, C. B., Hall, J. A., Hornick, J. L., Ibrahim, M., Marchetti, A., Miller, K., van Krieken, J. H., Nielsen, S., Swanson, P. E., Vyberg, M., Zhou, X., Taylor, C. R., & From the International Society for Immunohistochemistry and Molecular Morphology (ISIMM) and International Quality Network for Pathology (IQN Path) (2017). Evolution of Quality Assurance for Clinical Immunohistochemistry in the Era of Precision Medicine. Part 3: Technical Validation of Immunohistochemistry (IHC) Assays in Clinical IHC Laboratories. Applied immunohistochemistry & molecular morphology : AIMM, 25(3), 151–159. https://doi.org/10.1097/PAI.0000000000000470
- Bain BJ, Bates I, Laffan MA. Dacie and Lewis Practical Haematology: Expert Consult: Online and Print 12th Edition (Elsevier). 2016.
- Jiang, Y., Dong, S., & Wang, Y. (2025). Antibody–Drug Conjugates Targeting CD30 in T-Cell Lymphomas: Clinical Progression and Mechanism. Cancers, 17(3), 496. https://doi.org/10.3390/cancers17030496
- Kantarjian, H. M., Boissel, N., Papayannidis, C., Luskin, M. R., Stelljes, M., Advani, A. S., Jabbour, E. J., Ribera, J. M., & Marks, D. I. (2024). Inotuzumab ozogamicin in adult acute lymphoblastic leukemia: Development, current status, and future directions. Cancer, 130(21), 3631–3646. https://doi.org/10.1002/cncr.35505
- Carpenter, R. O., Evbuomwan, M. O., Pittaluga, S., Rose, J. J., Raffeld, M., Yang, S., Gress, R. E., Hakim, F. T., & Kochenderfer, J. N. (2013). B-cell maturation antigen is a promising target for adoptive T-cell therapy of multiple myeloma. Clinical cancer research : an official journal of the American Association for Cancer Research, 19(8), 2048–2060. https://doi.org/10.1158/1078-0432.CCR-12-2422
- Naresh, K. N., Lampert, I., Hasserjian, R., Lykidis, D., Elderfield, K., Horncastle, D., Smith, N., Murray-Brown, W., & Stamp, G. W. (2006). Optimal processing of bone marrow trephine biopsy: the Hammersmith Protocol. Journal of clinical pathology, 59(9), 903–911. https://doi.org/10.1136/jcp.2004.020610