Introduction
A key component of pre-transfusion testing is antibody identification (ABID). This procedure identifies clinically significant antibodies present in the recipient’s plasma or serum that can react with antigens on donor red blood cells (RBCs). These antibodies can be naturally occurring (alloantibodies) or develop after previous blood exposure (alloantibodies) or pregnancy (anti-Rh). When a recipient’s antibody encounters its corresponding antigen on donor RBCs, it triggers an immune response, leading to agglutination (clumping) or hemolysis (destruction) of the RBCs.
ABID helps ensure blood safety by identifying the specific antigens the recipient’s antibodies target. This information is then used for selecting compatible blood products from donors lacking the corresponding antigens.
Principle of Antibody Identification
The principle behind antibody identification relies on antigen-antibody specificity. Human RBCs possess various surface antigens belonging to different blood group systems such as Rh, ABO, Duffy, Kidd, and MNSs. These antigens can be recognized by the recipient’s immune system. In some cases, exposure to foreign RBCs through blood transfusion, pregnancy, or fetomaternal hemorrhage can lead to the development of antibodies against specific antigens absent on the recipient’s own cells.
A positive antibody screening test indicates the presence of such antibodies in the recipient’s plasma or serum. However, it doesn’t identify the specific antigen(s) targeted by these antibodies. This is where antibody identification comes in.
During antibody identification, the recipient’s plasma or serum is tested against a panel of well-characterized RBCs, each possessing a defined set of antigens (minimum of 8 group O red cells). These panel cells are typically type O red blood cells to minimize interference from ABO blood group antigens.
Inclusion of the patient’s red blood cells in the panel is crucial. If the patient’s own cells react with the plasma/serum, it suggests the presence of an autoantibody. Conversely, no reaction with the patient’s cells indicates an antibody against a high-frequency antigen present on the patient’s red blood cells. The testing methodology involves incubating the recipient’s sample with each panel cell under controlled conditions, mimicking the in vivo environment. Following incubation, the test is examined for agglutination (clumping) or hemolysis (destruction) of red blood cells.
To ensure accurate identification of antibody specificity
- The recipient’s plasma must react with at least two different red blood cell (RBC) samples that possess the suspected antigen.
- Conversely, the plasma should not react with at least two different RBC samples that lack the antigen.
Importance of comprehensive testing
- It’s crucial to verify the absence of other clinically significant antibodies. This is achieved by using RBCs that are negative for the identified antigen but positive for other relevant antigens.
- Failing to detect all antibody specificities in a sample can lead to a potentially life-threatening hemolytic transfusion reaction.
- To minimize this risk, specific antibodies like anti-Jka, anti-Jkb, anti-S, anti-s, anti-Fya, and anti-Fyb should be actively excluded. This can be done using RBCs that have double dose expression (homozygous) of the corresponding antigen. For instance, to exclude anti-Jka, a single sample of Jk(a+b-) RBCs (homozygous for Jka) would suffice.
Materials
- Patient plasma or serum from approximately 10 – 20 mL anticoagulated blood. Fresh samples (ideally less than 3 days old) are preferred to ensure optimal reactivity of antibodies and complement proteins.
- Screening cell panel. These pre-typed panels consist of group O RBCs lacking the A and B antigens but possessing a variety of antigens from different blood group systems (Rh, Duffy, Kidd, MNSs, etc.). To ensure comprehensive antibody detection, the panel should consist of at least eight group O RBCs with diverse antigen profiles from various blood group systems.
- Anti-human globulin (AHG) solution
- Coombs control cells (CCC)
- Low ionic strength solution (LISS)
- Patient’s red cell in 2 – 4% suspension
- Enzymes (optional): Enzymes like papain or ficin can be used to enhance weak antibody reactions, particularly for cold-reacting antibodies.
- Micropipettes and sterile tips
- Warm water bath or incubator for maintaining incubation temperature (37°C)
- Test tubes
- Centrifuge
- Antigram result panel
Reagent Criteria
This criteria is taken from BCSH Guideline: Pre-Transfusion Compatability Procedures (2012).
Cell Panel Composition
An effective antibody identification panel should consist of red blood cells (RBCs) from at least eight different group O donors. This diversity ensures sufficient antigen representation for various blood group systems. For each clinically important antibody, the panel should include:
- At least two RBC samples lacking the corresponding antigen: This allows confirmation that a patient’s plasma reacts specifically with the target antigen.
- At least two RBC samples expressing the corresponding antigen: This helps verify the presence of the antibody and its reactivity with the target antigen.
Additionally, the panel should be designed to identify mixtures of commonly encountered antibodies.
Key Phenotypes
- R1R1 (CDe/CDe) and R1wR1 (CDe/CwDe): These cells should collectively express antigens K, k, Fya, Fyb, Jka, Jkb, S, and s, which are targets for several significant antibodies. At least one example of each phenotype is required.
- R2R2(cDE/cDE), r’r (Cde/cde) and r”r (cdE/cde): These phenotypes provide additional antigen combinations for antibody detection. One example of each is needed.
- Minimum three rr (cde/cde) cells: These lack most Rh antigens but are crucial for excluding antibodies like anti-Jka, anti-Jkb, etc. At least one K+ cell (expressing the Kell antigen) should be included among the three. Collectively, these rr cells should express all of k, Jka, Jkb, S, s, Fya, and Fyb in a double dose.
Limitations and Best Practices
It’s important to acknowledge that a single panel might not identify all possible antibody combinations. Therefore, for enhanced accuracy:
- Strongly consider using two different panels: This significantly increases the chance of detecting a mix of antibodies while simultaneously excluding additional clinically relevant ones.
- Maintain panel integrity: Laboratories should have measures in place to ensure the antigenicity (ability to bind antibodies) of panel cells remains intact throughout their usable lifespan.
- To improve the identification of complex antibody mixtures: Incorporate a panel of enzyme-treated red blood cells. These cells help identify antibodies targeting antigens susceptible to enzyme modification, potentially leading to missed reactions with untreated cells.
Protocol
This protocol outlines the general steps for antibody identification in blood transfusion. Always refer to the specific manufacturer’s instructions for your chosen panel and reagents.
- Clearly label test tubes according to the specific panel RBCs they will contain. Include an additional tube for the autocontrol using patient’s own RBCs.
- Add two drops of the patient’s serum to each labeled tube. Gently resuspend the serum with the RBCs in each tube to ensure thorough mixing.
- Add two drops of LISS reagent to each tube and mix thoroughly. LISS enhances antibody-antigen interactions.
- Add one drop of the corresponding panel RBC suspension to each respective labeled tube. In the autocontrol tube, add one drop of the patient’s own RBC suspension. Gently mix the suspensions in all tubes.
- Incubate all tubes at 37°C for 10-15 minutes. During incubation, gently mix the suspensions every 5-10 minutes following the manufacturer’s instructions. This allows for optimal antibody-antigen interaction.
- Centrifuge the tubes and carefully observe for any visible agglutination (clumping) or hemolysis (lysis) of RBCs in each tube. Grade the observed reactions and record them in the corresponding temperature (37°C) column of the antigram form.
- Wash the RBCs in each tube with normal saline solution three times. After each wash, completely decant the supernatant leaving the RBC button behind.
- Add two drops of AHG reagent to each washed RBC suspension in the tubes. Centrifuge the tubes again.
- Gently resuspend the RBCs in each tube and examine for agglutination. This step helps detect antibodies that may bind to RBCs but not cause visible agglutination in the initial incubation step.
- Grade any observed agglutination reactions and record them in the corresponding AHG column of the antigram form.
- If no agglutination is observed in any tube after AHG addition, add Coombs control cells to one of the tubes. This validates the functionality of the AHG reagent and the overall test procedure, similar to the use of positive controls in other tests.
Interpretation
In general, patients lack the antigens they have formed antibodies against (alloantibodies). For example, a patient with anti-C antibodies should not possess the C antigen on their own red blood cells.
Antibody Identification Strategy
The initial step in antibody identification focuses on excluding antibodies unlikely to be responsible for the observed reactivity pattern. If multiple antibodies are suspected, additional panels might be necessary to definitively confirm or exclude their presence. Antigrams interpretation steps will be covered in Antibody Identification Antigram Interpretation.
Positive IAT Crossmatch with Negative Antibody Screen/Identification
Several possibilities can explain a positive Indirect Antiglobulin Test (IAT) crossmatch reaction despite a negative antibody screen and identification:
- Low-Frequency Antigen: The recipient’s plasma might contain an antibody against a rare antigen (low frequency) present on the donor’s red blood cells. Current antibody screening panels might not include all possible antigen specificities.
- IgG-Coated Donor Red Cells: The donor red blood cells might be coated with IgG antibodies from a previous transfusion or another cause, leading to a non-specific positive crossmatch.
- Blood Selection Error: There could be a clerical error in blood selection, resulting in the wrong blood group being used for crossmatching.
All Panel Cells Positive, Negative Autocontrol and DAT
When all panel cells in the antibody identification test show positive reactions, but the patient’s own red blood cells (autocontrol) and Direct Antiglobulin Test (DAT) are persistently negative, further investigation is needed depending on the blood group:
- Bombay Blood Group: Consider the possibility of the Bombay blood group, a rare condition where both A and B antigens are absent.
- Anti-HI: Consider the presence of anti-HI, an antibody directed against a high-incidence antigen present on most red blood cells. Specific tests exist to exclude anti-HI, involving incubation of the patient’s plasma with red blood cells known to lack the HI antigen.
Frequently Asked Questions (FAQs)
What is the 11 cell panel for antibody identification?
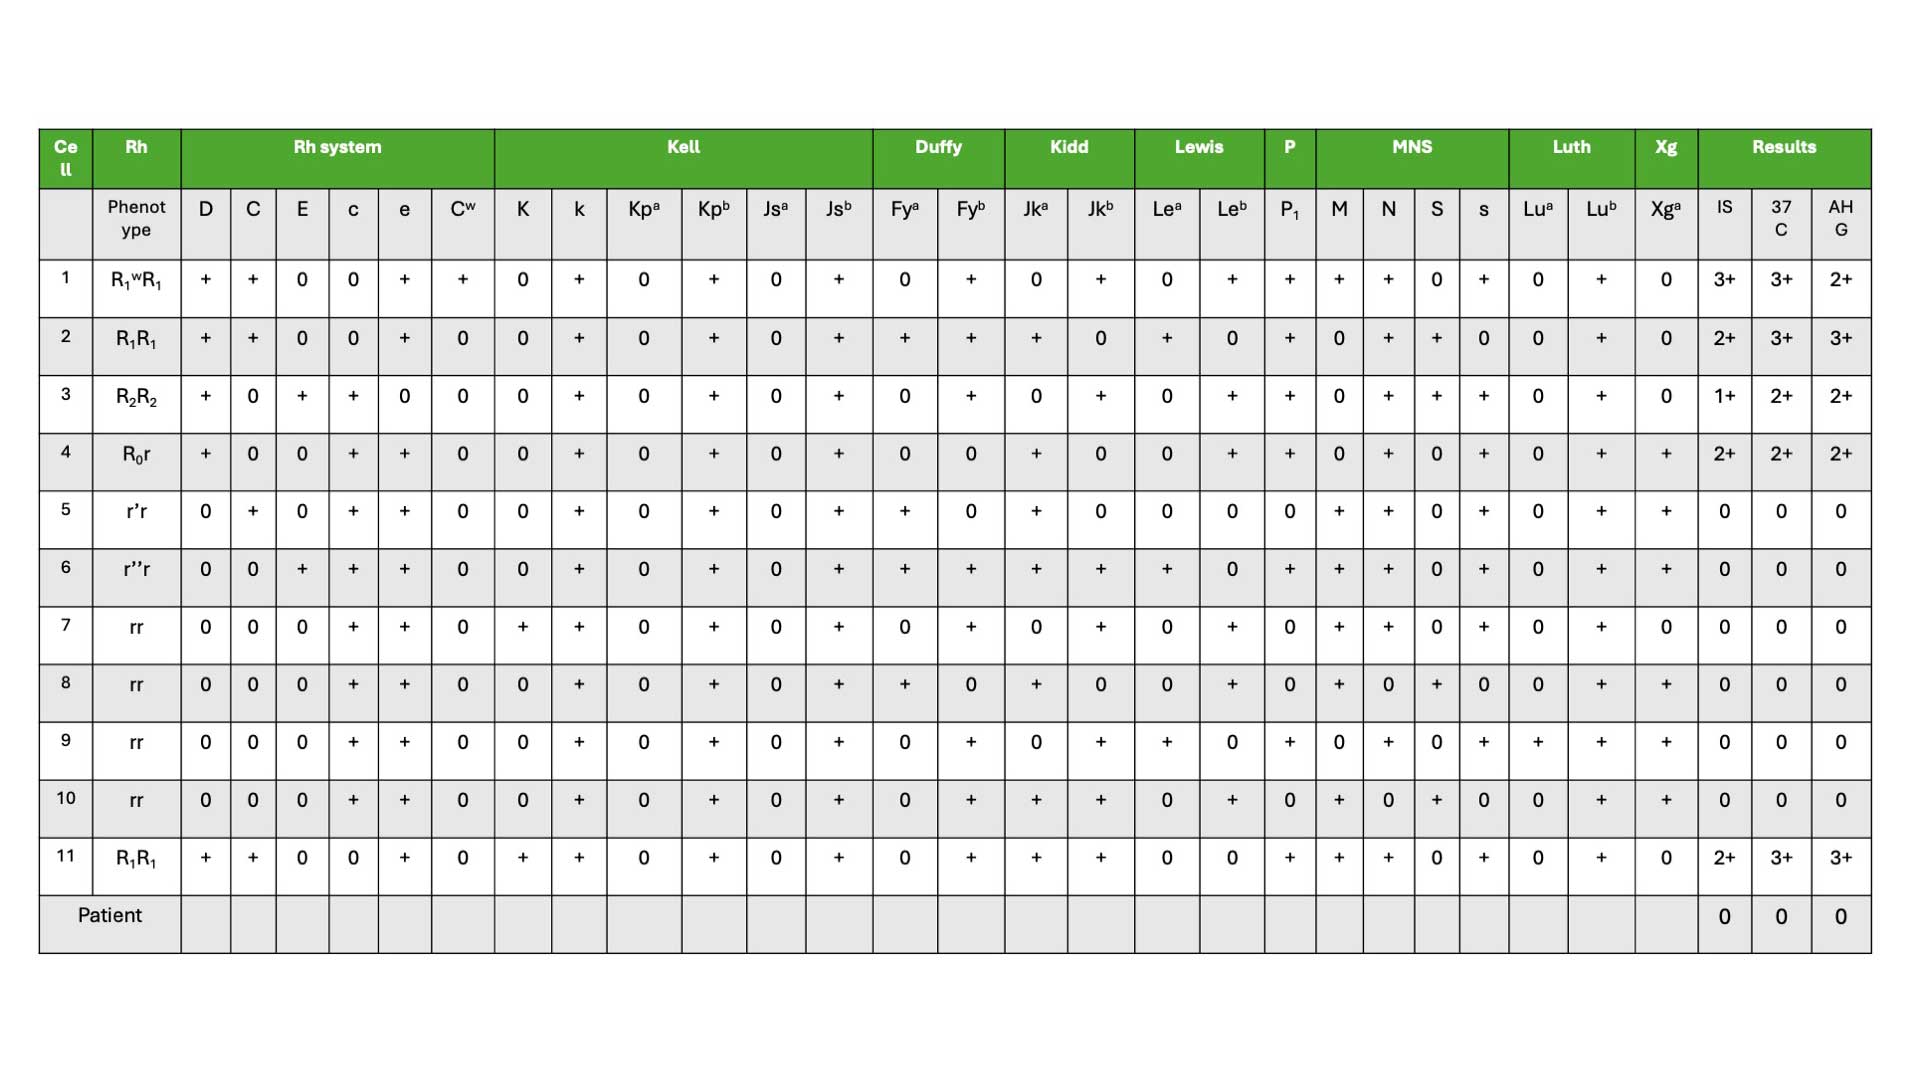
An 11 cell panel for antibody identification is a set of red blood cells (RBCs) from eleven different group O donors, used to identify antibodies present in a recipient’s blood sample. These group O RBCs are specifically chosen because they lack the A and B antigens, allowing the detection of antibodies targeting other blood group antigens. The 11 cell panel serves as a valuable first-line tool for antibody identification. Its balance of efficiency and coverage makes it a practical choice for routine blood bank procedures. However, laboratories are aware of its limitations and may utilize additional resources or techniques when necessary to ensure comprehensive antibody detection and safe blood transfusions.
Benefits of the 11 Cell Panel
- Efficiency: It provides a good balance between comprehensiveness and practicality. With 11 different group O donors represented, the panel covers a significant number of common blood group antigens from various systems (Rh, Duffy, Kidd, MNSs, etc.).
- Standardization: It offers a relatively standardized approach that allows for consistent results across different laboratories. This facilitates communication and interpretation of antibody identification findings.
- Cost-effectiveness: Compared to using a larger panel with many more cells, the 11 cell panel is a more cost-effective option for routine antibody identification.
Limitations of the 11 Cell Panel
- Incomplete Coverage: While it covers a significant portion of common antigens, it may not detect antibodies against rare antigens.
- Antibody Mixtures: If a patient has multiple antibodies, the 11 cell panel might not be sufficient to fully differentiate them.
- Low-Frequency Antigens: As mentioned earlier, antibodies directed against low-frequency antigens might be missed using this panel.
Addressing Limitations
- Additional Panels: Laboratories can supplement the 11 cell panel with other panels designed to detect antibodies against less common antigens.
- Enzyme Treatment: Enzymes like papain or ficin can be used to enhance the detection of weak antibodies, especially those targeting antigens affected by the enzyme.
- Advanced Techniques: In complex cases, additional techniques like adsorption-elution studies or molecular analysis might be employed for more definitive antibody identification.
What is the rule out antibody identification?
In antibody identification, “rule out” (also referred to as exclusion or cross-out) is a process used to identify antibodies that are unlikely to be present in the patient’s blood sample.
The Basic Principle
- When a patient’s plasma/serum reacts with red blood cells (RBCs) from the antibody identification panel, it suggests the presence of an antibody targeting a specific antigen on those RBCs. However, the absence of a reaction with a specific cell doesn’t necessarily mean the corresponding antibody is absent.
How Rule-Out Works
- Target Antigen: Consider a panel cell that is positive for a specific antigen (let’s call it antigen X).
- Expected Reaction: If the patient has an antibody against antigen X, one would expect their plasma/serum to react (agglutination or hemolysis) with this panel cell.
The Rule-Out Logic
- Key Point: For “rule-out” to be valid, the panel cell used for exclusion must be homozygous positive for the antigen in question.
- Homozygous means the cell has two copies of the gene for antigen X, ensuring its strong presence on the cell surface. This ensures that even weak antibodies have a higher chance of reacting and being ruled out definitively. Exceptions might be made for specific antibodies like anti-K, which is very rarely encountered.
- No Reaction Observed: If the patient’s plasma/serum shows no reaction with this homozygous positive cell for antigen X, it’s highly unlikely the patient has an antibody against antigen X. This is because if such an antibody were present, it would react strongly with the readily available antigen on the homozygous positive cell.
- Multiple Steps: Ruling out multiple antibodies is a stepwise process. After excluding one antibody based on its expected antigen, the remaining possibilities are then considered for further rule-out steps.
Benefits of Rule-Out
- Efficiency: It streamlines the identification process by focusing on antibodies more likely to be present based on the observed reactions.
- Accuracy: By excluding unlikely antibodies, the interpretation becomes more precise, reducing the risk of misidentification.
Limitations of Rule-Out
- Heterozygous Cells: Using a heterozygous cell (only one copy of the antigen gene) for rule-out can be misleading. A weak antibody might not react with a single antigen copy, leading to a false-negative exclusion. Laboratories typically avoid using heterozygous cells for crucial exclusions.
- Dosage Effect: Some antibodies react more strongly with homozygous cells compared to heterozygous ones. Careful consideration is needed when interpreting results from cells with varying antigen strengths.
Disclaimer: This protocol is intended for informational purposes only and may need to be modified depending on the specific laboratory procedures and patient circumstances. Always consult with a qualified healthcare professional for guidance. See additional information.
References
- American Association of Blood Banks (AABB). Technical Manual, 21st Edition, 2023.
- Dean L. Blood Groups and Red Cell Antigens [Internet]. Bethesda (MD): National Center for Biotechnology Information (US); 2005.
- Bain BJ, Bates I, Laffan MA. Dacie and Lewis Practical Haematology: Expert Consult: Online and Print 12th Edition (Elsevier). 2016.
- International Society of Blood Transfusion. https://www.isbtweb.org/resources/resources-library.html
- British Committee for Standards in Haematology, C. Milkins, J. Berryman, C. Cantwell, C. Elliott, R. Haggas, J. Jones, M. Rowley, M. Williams, N. Win (2013). Guidelines for pre-transfusion compatibility procedures in blood transfusion laboratories. Transfusion Medicine. 2023(1): 3-35.
- Knowles, S.M., Milkins, C.E., Chapman, J.F. & Scott, M. (2002) The United Kingdom National External Quality Assessment Scheme (blood transfusion laboratory practice): trends in proficiency and practice between 1985 and 2000. Transfusion Medicine, 12, 11–23.
- SHOT (1996–2010) Serious Hazards of Transfusion annual reports. (Accessed 31/05/24).