Procedure-At-A-Glance
- Assemble the casting tray with a comb sized to your sample number.
- Weigh the agarose powder for your target percentage (for example, 1 g in 100 mL of 1× TBE or TAE for a 1% gel).
- Microwave in short bursts, swirling between each burst, until the solution is fully clear with no fine bubbles. Use heat-resistant gloves; the flask gets very hot.
- Cool the flask to about 50°C (touchable but warm). Add your DNA stain and swirl to mix.
- Pour into the casting tray. Pop or push aside any bubbles. Let it set undisturbed for 30 to 45 minutes.
- Remove the comb. Place the gel in the tank. Cover with running buffer.
- Mix samples with loading dye and pipette into the wells. Always load a DNA ladder in the first well and include a non-template control.
- Connect the power supply with the wells at the cathode (black, negative). DNA runs to the anode (red, positive).
- Run at 5–8 V/cm until the dye front has migrated about two-thirds down the gel.
- Visualize on a UV transilluminator or blue-light imager. Wear a UV face shield if using UV.
Introduction
Conventional polymerase chain reaction (PCR) lets us amplify a specific stretch of DNA millions of times over [1,2]. In hematology, this matters because diagnoses such as beta-thalassemia, sickle cell disease, and other hemoglobinopathies often start with amplifying a region of the beta-globin gene (HBB) before sequencing. But amplification on its own is invisible. To see whether the reaction actually produced what you wanted, you need agarose gel electrophoresis.
Agarose gel electrophoresis separates DNA fragments by size in a porous gel under an electric field [1,2]. Each band you see on the imager is a population of DNA molecules of a particular length. This guide walks through the principle, materials, and step-by-step protocol, then covers buffer choice, voltage, gel percentage, and troubleshooting.
While manual slab gels remain the foundational workhorse for many protocols, high-throughput clinical hematology and genetics labs increasingly rely on automated capillary electrophoresis (CE) systems. CE automates the injection, separation, and fluorescent detection of DNA in microcapillaries. This method requires only microliters of sample and provides highly precise digital quantification and sizing, eliminating manual gel pouring and minimizing exposure to hazardous stains [6].
Principle
Agarose is a polysaccharide extracted from red seaweed. When dissolved in hot buffer and cooled, it forms a semi-solid matrix laced with pores [2,3]. Those pores act as a molecular sieve.
DNA carries a negative charge from its phosphate backbone. Apply an electric field across the gel and DNA migrates toward the positive electrode. Smaller fragments thread through the pores easily and travel further. Larger fragments drag and stay closer to the wells. Run for the right amount of time, stain with a fluorescent dye, and you get a ladder of bands sorted by size [1,3].
Materials
For the gel
- Agarose powder (molecular biology grade)
- 1× TAE (Tris-Acetate-EDTA) or 1× TBE (Tris-Borate-EDTA) buffer
- Microwave-safe Erlenmeyer flask (typically 250 mL)
- Gel casting tray with comb
- DNA stain — preferably SYBR Safe, GelRed, or RedSafe; EtBr only where required [4]
- Heat-resistant gloves, lab coat, safety goggles
For sample loading
- Micropipettes and tips
- DNA samples (PCR products) and a non-template control
- 6× DNA loading dye
- DNA ladder (for typical hematology amplicons, a 100 bp ladder works well)
Safety Before You Start
Before the first burst in the microwave, set up for safety. Hot agarose can boil over and cause steam burns; always use heat-resistant gloves and watch the flask through short heating intervals. Ethidium bromide is a known mutagen and must be handled in a designated area with nitrile gloves and a dedicated waste stream [4]. UV transilluminators emit UV-B that can damage skin and eyes within seconds, so always wear a UV-blocking face shield and cover exposed skin. If your lab has a blue-light imager, use it; it is safer and gentler on DNA you may want to recover for sequencing.
Protocol
Preparation
- Put on gloves, goggles, and a lab coat.
- Set up the gel casting tray with comb of your desired size.
- Calculate the agarose mass: grams of agarose = (target % ÷ 100) × buffer volume in mL. For a 2% gel in 50 mL of buffer, that is 1 g.
- Weigh the agarose powder and add it to the flask.
- Add the chosen 1× TAE or 1× TBE buffer to the target volume. For runs of fewer than 10 samples, a small 30 mL gel is fine.
- Swirl gently to wet the powder.
Melting
- Microwave on high in 30-second bursts, swirling between each burst.
- Continue until the solution is completely clear and free of fine bubbles. The flask will be very hot; use heat-resistant gloves.
Cooling and Pouring
- Cool the flask to about 50°C (warm but touchable). This step prevents the casting tray from warping and protects heat-sensitive dyes.
- Add the staining dye. For SYBR Safe, follow the manufacturer's recommendation (typically 1× final from a 10,000× stock). For EtBr, around 5 µL per 100 mL of gel solution is common, but check your local protocol.
- Swirl gently to mix.
- Pour into the casting tray with the comb in place. Use a pipette tip to pop bubbles or push them to the edge.
- Let the gel set undisturbed at room temperature for 30 to 45 minutes. If you need to store it, wrap in cling film and refrigerate at 4°C for no more than a day or two before use.
In-Gel vs. Post-Staining
This section represents the standard "in-gel staining" method. While highly convenient, intercalating dyes alter the mass and charge of DNA molecules, which can slightly shift migration rates. For highly sensitive assays where precise sizing is critical, use "post-staining" (running the gel without dye, then soaking it in a dye bath afterward). Post-staining prevents dye-induced migration artifacts and often yields a cleaner background [3,4].
Loading and Running
- Carefully remove the comb without tearing the wells.
- Place the gel in the electrophoresis tank with the wells at the cathode (black, negative) end. DNA will run toward the anode (red, positive) — remember "run to red."
- Add running buffer until the gel is fully covered (typically 2–3 mm above the surface).
- Prepare each sample by mixing PCR product with 6× loading dye in a 5:1 ratio. For example, 5 µL of PCR product plus 1 µL of 6× dye gives a 6 µL load.
- Pipette samples into the wells. Always load a DNA ladder in the first well and a non-template control in another well.
- Close the lid and connect the leads. Set voltage using the volts-per-centimeter rule below.
- Run until the dye front has migrated about two-thirds of the way down the gel — typically 30 to 60 minutes at 70–100 V on a standard tank.
The Function of Loading Dye
The loading dye serves two critical functions. First, it contains density agents (such as glycerol, sucrose, or Ficoll) that weigh the DNA sample down, ensuring it sinks cleanly into the well rather than diffusing into the running buffer. Second, it provides visible tracking dyes (like bromophenol blue and xylene cyanol) that migrate at known rates, allowing you to visually monitor the run's progress [3].
Visualization
- Transfer the gel to a UV transilluminator or blue-light imager.
- If using UV, wear a face shield. Capture an image with the gel documentation system.
- Record the voltage, run time, gel percentage, buffer, stain, and ladder used. Good documentation now saves you hours of confusion later.
Interpretation
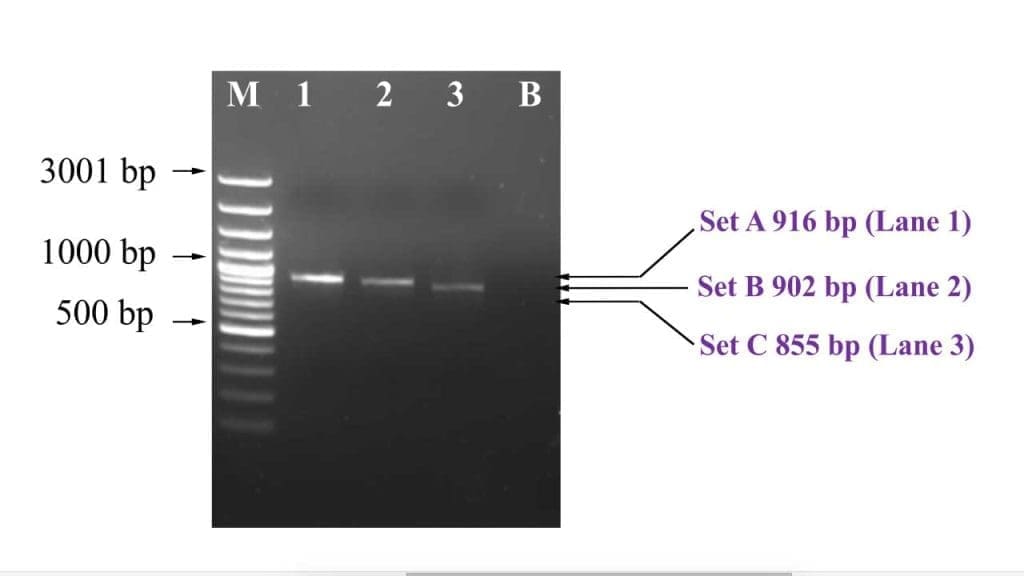
Read the gel against the ladder. Each band in your sample lane should match a known size on the ladder, and that size should match the amplicon length your primers were designed to produce.
Quality checks to confirm before reporting a result
If the band is correct, the PCR product can move on to sequencing or other downstream work [3].
The ladder shows clean, evenly spaced bands. If not, the run conditions were off.
The non-template control lane is empty. A band here means contamination, and the run cannot be trusted.
Your sample band sits at the expected size. A band that is too small or too large suggests mispriming, primer-dimer, or a different template.
Agarose Gel Preparation Tips
Choosing Between TAE and TBE Buffers
Both TAE and TBE work for routine agarose gel electrophoresis, but each has strengths.
TBE holds its buffering capacity longer because borate is a stronger buffer than acetate. For runs of more than an hour or for gels run at higher voltage, TBE keeps pH stable and produces tighter bands. It is the better choice for small fragments below 1,000 bp, which covers most hematology PCR work.
While 1× TBE is commonly cited, 0.5× TBE is strictly preferred by many modern labs for routine PCR analysis. Because borate is such a strong buffering agent, halving the concentration to 0.5× still provides ample buffering capacity for standard runs while significantly reducing the ionic strength of the solution. Lower ionic strength means less heat generation, allowing gels to be run safely at higher voltages without melting [3].
TAE is the standard when you plan to recover DNA from the gel for cloning, ligation, or sequencing. Borate ions in TBE can stick to DNA and inhibit some downstream enzymes. TAE also gives better separation for fragments above 4 kb.
| Feature | TAE (Tris-Acetate-EDTA) | TBE (Tris-Borate-EDTA) |
|---|---|---|
| Main acid | Acetic acid | Boric acid |
| Buffering capacity | Lower; can exhaust on long runs | Higher; stable over long periods |
| DNA migration | Faster | Slower |
| Best resolution | Large fragments (>4 kb) | Small fragments (<1 kb) |
| Downstream use | Ideal for DNA recovery and cloning | Borate may inhibit some enzymes |
| Heat generation | Higher at high voltage | Lower; stays cooler |
An Alternative: Sodium Borate (SB) Buffer
For high-speed applications, Sodium Borate (SB) buffer is an increasingly popular alternative to TAE and TBE. SB buffer possesses remarkably low conductivity, which drastically reduces heat generation. This allows gels to be run at extremely high voltages (up to 300 V, or roughly 30 V/cm) without overheating, cutting a standard 45-minute separation down to 10–15 minutes [7].
Setting the Voltage
Picking voltage is about balancing speed and band sharpness. Too low and the DNA diffuses into blurry blobs. Too high and the gel overheats, causing "smiling" bands or, in extreme cases, melting the gel.
The accurate way to set voltage is by the distance between electrodes, not by a fixed number. The standard for routine PCR work is 5 to 10 V/cm.
Total voltage = desired V/cm × distance between electrodes (cm)
Example: A tank with 15 cm between electrodes, run at 6 V/cm, needs 90 V.
| Setting | When to Use | Result |
|---|---|---|
| Low (1–4 V/cm) | Large genomic DNA, fine mapping | Sharp bands; takes hours or overnight |
| Medium (5–8 V/cm) | Standard PCR amplicons (e.g., HBB) | Best balance of speed and clarity |
| High (>10 V/cm) | Quick yes/no checks | Fast (about 20 min) but risks smiling and overheating |
Choosing the Gel Percentage
The agarose percentage sets the pore size of the matrix. Too loose and small fragments race through unresolved. Too tight and large fragments stall at the wells.
- 0.7%–1% for large fragments (5–10+ kb), such as genomic DNA or large plasmids
- 1.0% for standard PCR products and restriction digests (500–5,000 bp)
- 1.5% for small PCR amplicons and screening (200–3,000 bp)
- 2% for high-resolution separation of small fragments (50–2,000 bp)
- 3% for very small fragments and allele-distinguishing work (<500 bp)
| Agarose % | Resolution Range | Common Use |
|---|---|---|
| 0.7% | 5,000–10,000 bp | Genomic DNA, large plasmids |
| 1.0% | 500–5,000 bp | Standard PCR products |
| 1.5% | 200–3,000 bp | Small PCR amplicons, screening |
| 2.0% | 50–2,000 bp | High-resolution small fragments |
| 3.0% | <500 bp | Distinguishing alleles |
How to Calculate the Mass Needed
To prepare your gel, you use a weight-to-volume percentage (w/v). The formula is:
Grams of Agarose = Desired %/100 x Volume of Buffer (mL)
Example: If you need a 2% gel and your casting tray holds 50 mL of buffer: 0.02 x 50 mL = 1 gram of agarose
A Note on Stains and Imaging
Ethidium bromide remains effective and inexpensive, but it is a mutagen and is no longer the default in many teaching and clinical labs [4]. SYBR Safe, GelRed, and RedSafe offer comparable sensitivity with much lower toxicity, and they pair well with blue-light imagers. Blue-light transillumination has two advantages: it is safer for the user, and it causes less photodamage if you intend to excise a band for sequencing [4]. If your lab has the choice, default to a safer stain plus blue light.
Pre-cast systems such as E-Gel run on a self-contained cassette and cut prep time to minutes. They are common in teaching and clinical settings and are worth recognizing even if your lab still pours its own gels.
Troubleshooting
Gel will not solidify. Likely cause: wrong agarose percentage, incomplete melting, or pouring while too hot. Recheck your math, microwave longer in short bursts, and let the flask cool to about 50°C before pouring.
Bubbles in the gel. Air trapped during pouring. Pour gently, pop bubbles with a pipette tip, or push them to the gel edge.
Blurry or smeared bands. Overloaded wells, voltage too high, or degraded DNA. Load less sample, drop the voltage, and confirm DNA integrity before re-running.
Faint or no bands. Too little DNA, weak staining, or too little run time. Quantify the DNA, confirm stain concentration, and extend the run if needed.
Uneven migration across lanes. Tilted gel tray, uneven buffer level, or bubbles under the comb. Level the tray, top up the buffer, and remove trapped bubbles before the run.
"Smiling" bands. The gel is running too hot. Lower the voltage or switch to TBE, which handles heat better.
Buffer level dropping or gel warping near the wells. Voltage exceeds buffer capacity. Reduce the voltage and consider using TBE for higher-voltage runs.
Documenting Your Gel
Good documentation turns a single image into reusable data. For each gel, record:
- Gel percentage and total volume
- Buffer type (TAE or TBE) and concentration
- Stain used and final concentration
- Ladder identity and lane position
- Voltage, run time, and tank dimensions
- Sample identifiers and lane order
- Whether a non-template control was included (it should be)
Save the raw image alongside any annotated version. If a result is later questioned, this record is what makes it defensible.
Frequently Asked Questions (FAQs)
Why is agarose gel electrophoresis used after PCR?
PCR copies a target DNA sequence millions of times, but you cannot see the product directly. Agarose gel electrophoresis separates the PCR product by size and lets you confirm whether a band of the expected length was produced. In hematology, this step verifies that the right region of a gene, such as HBB for beta-thalassemia, has been amplified before sequencing.
What agarose percentage should I use for a hematology PCR amplicon?
Most hematology PCR products fall between 200 and 1,500 bp, so a 1.5% to 2% gel works well. For very small fragments (under 500 bp), such as those used to distinguish closely spaced alleles, a 3% gel gives sharper separation. For genomic DNA or fragments above 5 kb, drop to 0.7% to 1%.
Is ethidium bromide still acceptable to use, or should I switch to SYBR Safe or GelRed?
Ethidium bromide is an established mutagen. Most teaching and clinical labs now default to SYBR Safe, GelRed, or similar dyes, which are less hazardous and can be visualized with blue-light imagers that do not damage DNA. EtBr remains in use in some labs because it is cheap and sensitive, but it is no longer the recommended starting choice for new protocols.
Why is a non-template control important on every gel?
The non-template control (NTC) is a PCR reaction that contains all the reagents except the DNA template. A band in this lane means contamination has occurred somewhere in the PCR setup. Without an NTC, you cannot tell whether a band in your sample lane is real or carryover from another source. Always include one.
Why does my DNA appear to "smile" or smear instead of forming sharp bands?
A "smiling" gel, where the outer lanes run faster than the center, usually means the gel ran too hot. Lower the voltage or switch to TBE buffer, which dissipates heat better. Smearing usually means too much DNA in the well, degraded sample, or the run went on too long. Reduce the load volume, check sample integrity, and adjust the run time to the migration of the dye front.
Can I prepare an agarose gel in advance and store it?
Yes. Once solid, wrap the gel in cling film and store it at 4°C for up to one or two days. Beyond that, the gel dries and resolution drops. If you need to store longer, keep it submerged in running buffer in a sealed container.
Glossary of Related Medical Terms
- Agarose: A polysaccharide extracted from red seaweed. When melted and cooled, it forms a porous gel that acts as a sieve for DNA fragments.
- Amplicon: A piece of DNA produced by PCR. The "product" you load onto the gel.
- Anode / Cathode: The positive (red) and negative (black) electrodes. DNA, being negatively charged, runs from cathode to anode.
- Base pair (bp): The unit used to measure DNA fragment length. 1,000 bp = 1 kilobase (kb).
- Beta-globin gene (HBB): The gene encoding the beta chain of hemoglobin. Mutations here cause beta-thalassemia and sickle cell disease.
- DNA ladder: A premade mixture of DNA fragments of known sizes, run alongside samples as a size reference.
- Ethidium bromide (EtBr): A fluorescent DNA-binding dye that glows under UV light. A known mutagen; safer alternatives are now preferred.
- GelRed / SYBR Safe / RedSafe: Fluorescent dyes designed as safer, less mutagenic alternatives to EtBr.
- Loading dye: A colored, dense buffer mixed with the DNA sample. It weighs the sample down into the well and shows the migration front.
- Non-template control (NTC): A PCR reaction set up with everything except DNA template. If a band appears in this lane, the run is contaminated.
- PCR (polymerase chain reaction): A laboratory method that copies a specific DNA sequence many times so it can be detected and analyzed.
- TAE buffer: Tris-Acetate-EDTA. Better for large fragments and for DNA you plan to recover from the gel.
- TBE buffer: Tris-Borate-EDTA. Better buffering for long runs and sharper bands for small fragments.
- Thalassemia: An inherited disorder of hemoglobin production. Diagnosis often involves PCR followed by agarose gel electrophoresis.
- Transilluminator: The light source (UV or blue-light) used to visualize stained DNA bands in the gel.
- Voltage gradient (V/cm): The voltage applied per centimeter between the electrodes. The most accurate way to set run conditions.
Disclaimer: This protocol is for educational purposes only. Local laboratory standard operating procedures take precedence. It is not intended to be a substitute for informed professional medical advice, diagnosis, or treatment. Always consult a qualified healthcare professional for clinical decision-making. While the information presented here is derived from credible medical sources and is believed to be accurate and up-to-date, it is not guaranteed to be complete or error-free. See additional information.
References
- Lee, P. Y., Costumbrado, J., Hsu, C. Y., & Kim, Y. H. (2012). Agarose gel electrophoresis for the separation of DNA fragments. Journal of visualized experiments : JoVE, (62), 3923. https://doi.org/10.3791/3923
- Armstrong, J. A., & Schulz, J. R. (2015). Agarose gel electrophoresis. Current Protocols Essential Laboratory Techniques, 10(1), 7.2.1–7.2.22. https://doi.org/10.1002/9780470089941.et0702s10
- Green, M. R., & Sambrook, J. (2012). Molecular cloning: A laboratory manual (4th ed., Vols. 1–3). Cold Spring Harbor Laboratory Press.
- Haines, A. M., Tobe, S. S., Kobus, H. J., & Linacre, A. (2015). Properties of nucleic acid staining dyes used in gel electrophoresis. Electrophoresis, 36(6), 941–944. https://doi.org/10.1002/elps.201400496
- Asad, N., Smith, E., Shakya, S., Stegman, S., & Timmons, L. (2023). Sustainable Methodologies for Efficient Gel Electrophoresis and Streamlined Screening of Difficult Plasmids. Methods and Protocols, 6(2), 25. https://doi.org/10.3390/mps6020025
- Rifai, N., Horvath, A. R., & Wittwer, C. T. (2018). Tietz Textbook of Clinical Chemistry and Molecular Diagnostics (6th ed.). Elsevier.
- Brody, J. R., & Kern, S. E. (2004). Sodium boric acid: a Tris-free, cooler conductive medium for DNA electrophoresis. BioTechniques, 36(2), 214–216. https://doi.org/10.2144/04362BM02