Procedure-at-a-Glance
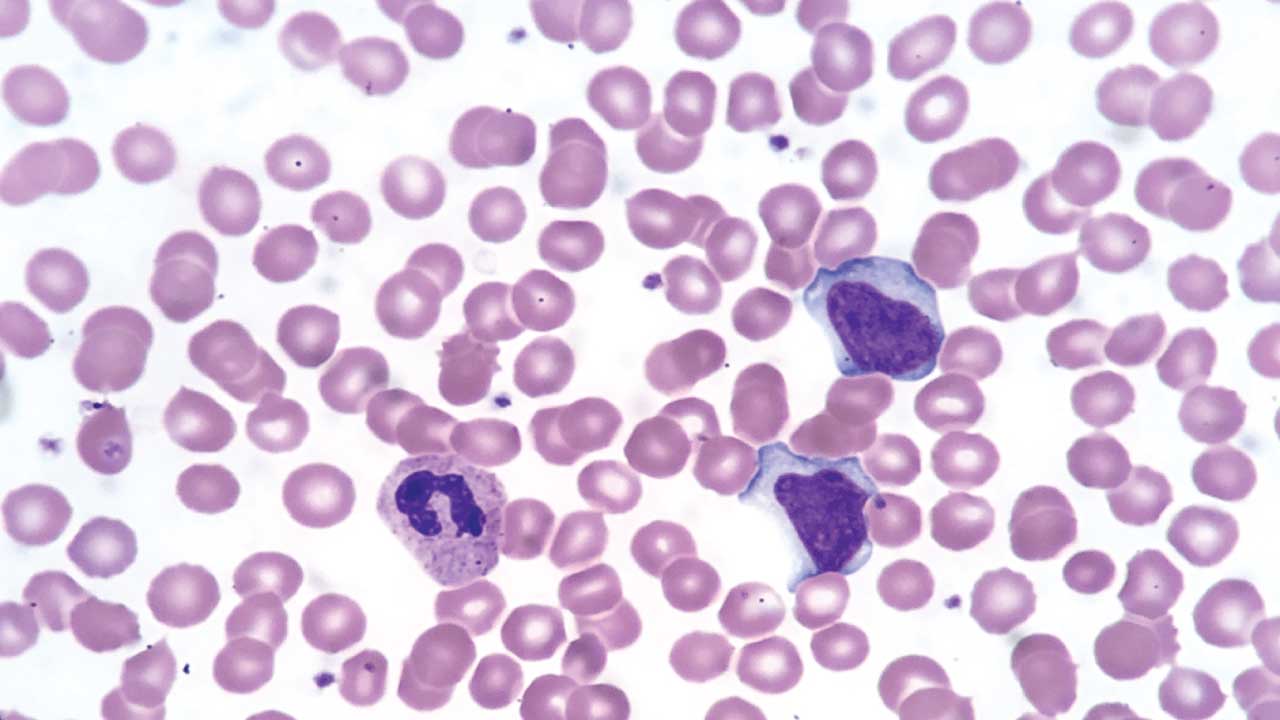
A peripheral blood smear is a thin film of blood spread on a glass slide and stained for microscopic review. It reveals cell shape, size, and inclusions that automated counters cannot fully describe [1,3].
| Step | Action | Key Tip | |
|---|---|---|---|
1 Preparation |
Clean two glass slides with lens paper. | Ensure no fingerprints or dust. |
|
2 Dispensing |
Place 1 small drop of EDTA blood 1 cm from the end. | Use a consistent drop size (~2–3 mm). |
|
3 Positioning |
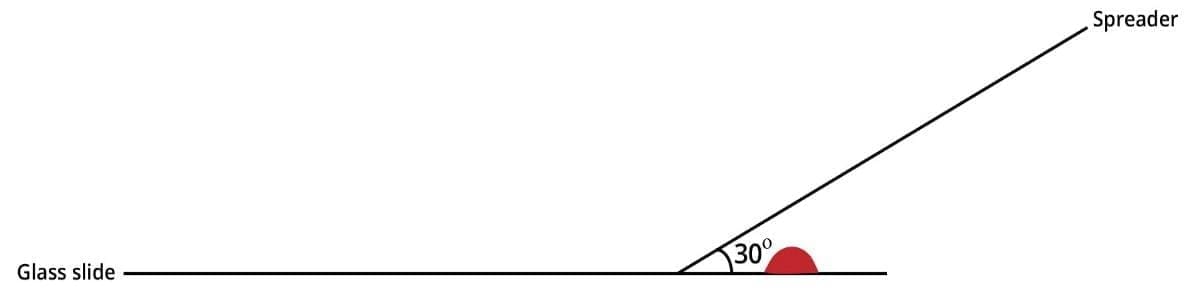
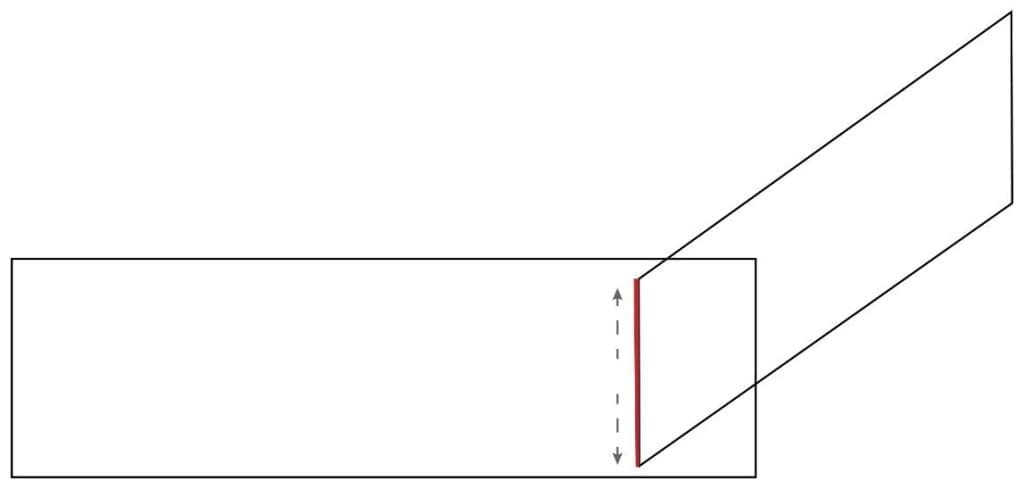
Place spreader slide at a 30° angle in front of the drop. | Angle determines smear thickness. |
|
4 Contact |
Pull spreader back until it touches the blood drop. | Let blood spread along the edge. |
|
5 Spreading |
Push forward rapidly and smoothly across the slide. | Do not stop mid-stroke. |
|
6 Drying |
Air dry or use a hair dryer on "Cool." | Rapid drying prevents RBC artifacts. |
Quick Checklist for a Perfect Peripheral Blood Smear
- Slide Quality: Are the slides lint-free and grease-free?
- Drop Size: Is the drop roughly 3mm in diameter?
- Timing: Was the smear made within seconds of placing the drop?
- The "Sweep": Was the motion smooth, fast, and at a consistent 30-45 degree angle?
Why the Peripheral Blood Smear Still Matters
Modern hematology analyzers count millions of cells in seconds. So why do we still spread blood on glass and look at it through a microscope?
The answer is simple. Counters give you numbers. A peripheral blood smear gives you the story behind the numbers. A film can reveal sickle cells, schistocytes, malaria parasites, blast cells, and toxic granulation in neutrophils. None of these always trigger an analyzer flag, and some never do [3,4].
This guide walks you through how to prepare a high-quality peripheral blood smear, what to look for on a good film, and how to troubleshoot the most common problems.
When Is a Peripheral Blood Smear Indicated?
A peripheral blood smear is usually requested alongside a complete blood count (CBC). It is specifically reviewed when:
- The analyzer flags abnormal cells, immature forms, or suspected blasts.
- Red cell indices (MCV, MCH, RDW) are abnormal or inconsistent with the patient's history.
- Platelet count is unexpectedly low (to check for clumping or pseudothrombocytopenia).
- Malaria, babesiosis, or other blood parasites are suspected.
- The patient is a neonate, or has known leukemia, lymphoma, or hemolytic anemia.
The International Council for Standardization in Haematology (ICSH) has published consensus criteria, often called the "41 rules," that guide when a film should be reviewed [4]. Most hospital laboratories adapt these into local policies.
Principle of Peripheral Blood Smear
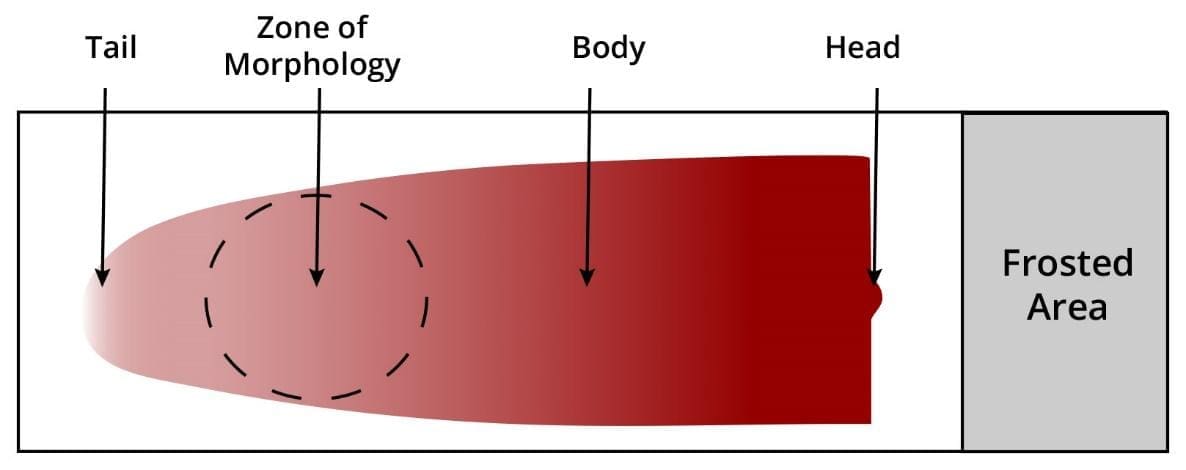
The technique creates a thin, even film of blood across a glass slide so that individual cells can be examined under a microscope [1]. A small drop of blood is pulled along the slide by a second slide (the spreader) held at a controlled angle. Done well, the smear ends in a feathered edge, with a band just behind it where cells lie side by side in a single layer. This band is the zone of morphology, and it is where all serious cell evaluation happens [3].
The wedge (push) technique described here is the most widely used method. Two alternatives exist: the coverslip method, which gives a more even distribution but is fragile, and the spun smear, which uses an automated centrifuge-based device. Both are described in standard references [1,2].
Materials
- EDTA-anticoagulated whole blood (less than two hours old is best)
- Two clean glass slides, 75 × 25 mm, ideally with a frosted end for labeling
- A second slide to act as the spreader (a chipped edge will ruin the smear)
- Lens paper or lint-free wipe
- Hair dryer set to "cool"
- Disposable gloves and a biohazard-rated work surface
- Fine-tipped pencil or laboratory marker for slide labeling
Protocol
- Put on gloves. Treat all blood samples as biohazardous.
- Label the frosted end of the slide with two patient identifiers (name and lab number, for example).
- Wipe both slides with lens paper. Even a fingerprint can produce visible holes in the final film.
- Mix the EDTA tube gently by inversion 8 to 10 times. Do not shake.
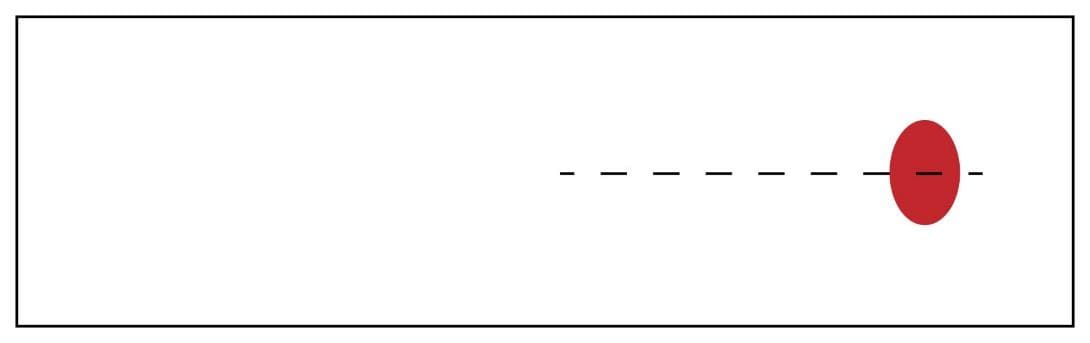
- Place a single small drop of blood (about 2 to 3 mm across) about 1 cm from one end of the slide, in the middle.
6. Hold the spreader slide at a 30 to 45 degree angle in front of the drop. Use a steeper angle (closer to 45°) if the sample looks pale or anemic, and a shallower angle (closer to 25 to 30°) if it looks thick or polycythemic.
7. Pull the spreader back gently until it touches the drop.
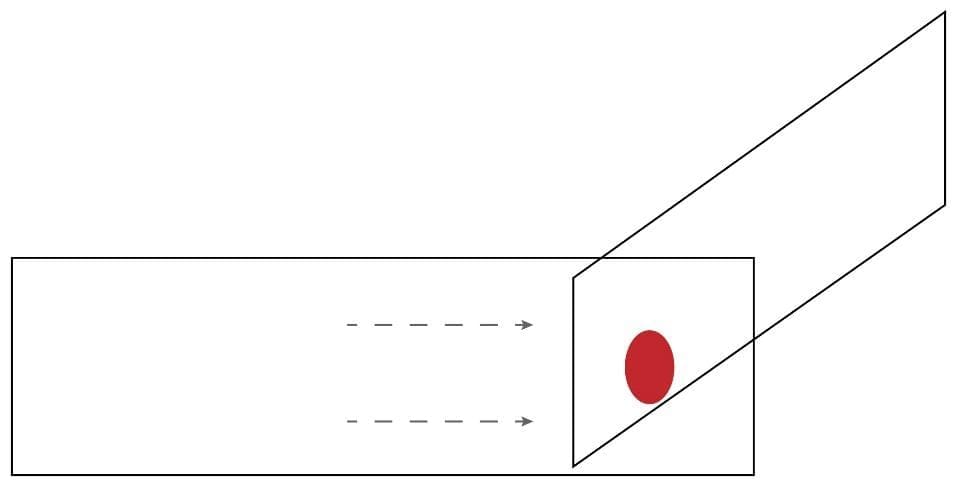
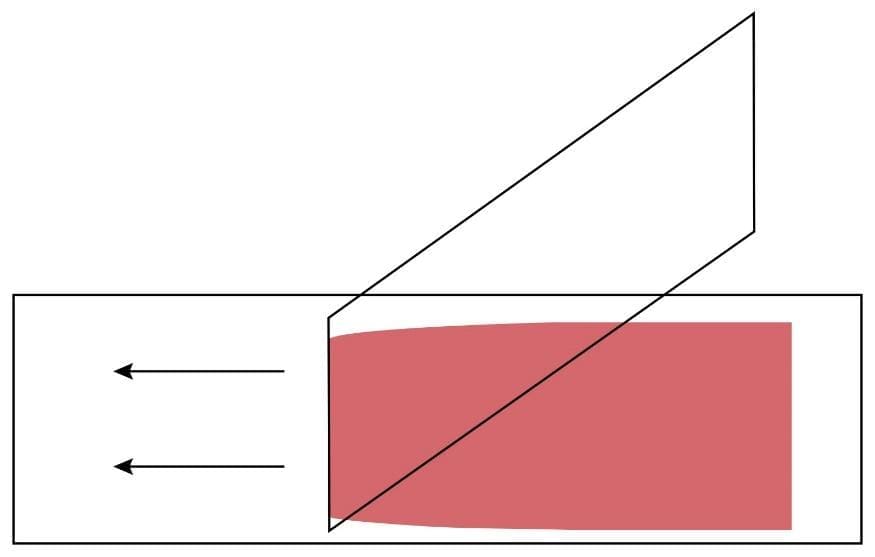
8. Let the blood spread along the full width of the spreader's edge.
9. Push the spreader forward across the slide in one smooth, rapid motion. The blood should cover roughly two-thirds of the slide and end in a feathered edge.
10. Air dry the smear, or speed it up with a hair dryer on the cool setting. Rapid drying prevents red cell crenation [1,2].
11. The smear is now ready for staining. See our Leishman Stain protocol for the next step.
Adjusting the Angle for Hematocrit
This is the single most useful trick most students never learn. Blood with a low hematocrit (anemia) is thinner and spreads further, producing an over-long smear. Tilting the spreader to a steeper angle (around 40–45°) compensates by making the film shorter and thicker. Blood with a high hematocrit (polycythemia) is the opposite: it is viscous and produces a short, thick smear, so a shallower angle (around 25–30°) is needed [1].
In practice, you will learn to judge this by eye after a few dozen smears.
Interpretation
A useful peripheral blood smear is read in a deliberate order. Skipping straight to high power is a common mistake.
Step 1: Low-power scan (10× objective). Check that the smear is well-spread, well-stained, and free of large clumps. Locate the zone of morphology, just behind the feathered edge. Roughly half the red cells should touch a neighbor, and half should be clearly separated.
Step 2: Red blood cells. In the zone of morphology, evaluate size (microcytic, normocytic, macrocytic), shape (sickle, target, spherocyte, schistocyte), color (hypochromic or normochromic), and any inclusions (Howell-Jolly bodies, Pappenheimer bodies, parasites).
Step 3: White blood cells. Perform a 100-cell differential at 40× or 100×. Look for left shift, toxic granulation, atypical lymphocytes, or blasts.
Step 4: Platelets. Estimate the count (roughly: average platelets per oil-immersion field × 15 to 20 = platelets ×10⁹/L). Note size and any clumps. Clumps near the feathered edge often explain a falsely low automated platelet count, a phenomenon called pseudothrombocytopenia [1,3].
A Note on Automated Digital Morphology
Many modern laboratories now use digital morphology systems such as CellaVision DM96 or Sysmex DI-60. These devices photograph the smear and pre-classify cells using image analysis, with a final review by a trained operator [7]. They do not replace the manual smear. They speed up review and improve consistency, but the slide still has to be made well in the first place. Everything in this guide still applies.
Troubleshooting Common Defects
A high-quality peripheral blood smear has a smooth, even appearance with a distinct feathered edge. If yours does not, use the table below to identify and fix the problem.
| Appearance | Likely Cause | Corrective Action |
|---|---|---|
|
Too short and thick
|
Spreader angle too steep, or motion too slow. | Lower the angle to ~30° and spread faster. |
|
Too long and thin
|
Spreader angle too shallow, or motion too fast. | Raise the angle and slow the spread. |
|
Holes or blank spots
|
Grease, fingerprints, or dust on the slide. | Use a fresh slide; handle by edges only. |
|
Streaks at the feathered edge
|
Drop dried before spreading, or chipped spreader edge. | Spread immediately; use a new spreader. |
|
Waves or ridges
|
Hesitation or jerky motion during the push. | Maintain one continuous, fluid stroke. |
|
Smear too narrow
|
Blood did not reach the full spreader width. | Wait a moment longer for blood to flow. |
|
Crenated red cells
|
Dried too slowly (humid environment). | Dry with a hair dryer on cool. |
|
Smudged white cells
|
Excessive pressure, or aged EDTA blood. | Use a lighter touch; use blood under 4 hours old. |
Quick Quality Checklist
- Slides lint-free, grease-free, and labeled with two identifiers.
- Drop size approximately 2 to 3 mm.
- Smear made within 2 hours of collection.
- Continuous, smooth motion at 30 to 45 degrees.
- Smear covers about two-thirds of the slide.
- Clear feathered edge present.
- Smear dried fully before staining.
Frequently Asked Questions (FAQs)
What is a peripheral blood smear and why is it done?
A peripheral blood smear is a thin film of blood spread on a glass slide, stained, and examined under a microscope. It allows direct inspection of the size, shape, and appearance of red cells, white cells, and platelets. It is used to investigate anemia, infection, suspected leukemia or lymphoma, parasitic infections like malaria, and any abnormal result flagged by an automated blood counter.
When should a manual blood smear be reviewed instead of relying on the automated count?
Manual review is recommended when the analyzer flags abnormal cells, when results fall outside age-specific reference ranges, in neonates, when malaria or other parasites are suspected, and in patients with known or suspected hematological disease. International consensus rules from the ICSH outline specific triggers for review.
How soon should a peripheral blood smear be made after blood collection?
Within two hours of collection is ideal. If EDTA blood sits for more than four to five hours, white blood cells may develop vacuoles and red cells may become crenated (shrunken and spiky), making accurate morphology impossible.
Why is my peripheral blood smear too short and thick?
This is usually caused by a spreader angle that is too steep (greater than 45°), or moving the spreader too slowly. Lower the angle and increase your spreading speed.
Can I use finger-prick (capillary) blood for a peripheral blood smear?
Yes. Wipe away the first drop, then place the second drop directly on the slide and spread quickly to avoid clotting. Capillary smears actually have an advantage for malaria diagnosis and neonatal samples, since they avoid EDTA-related artifacts.
What is the "Zone of Morphology"?
This is the area just behind the feathered edge of the peripheral blood smear. About half the red cells should be slightly touching a neighbor, and half should be clearly separated. This is where all reliable cell evaluation takes place.
When does a sample need a manual blood film review?
When the analyzer flags abnormal cells, when red cell or platelet indices are abnormal, when malaria or other parasites are suspected, in neonates, and in patients with known hematological disease [4].
What is pseudothrombocytopenia?
It is a falsely low platelet count caused by EDTA-induced platelet clumping in the test tube. The clumps appear near the feathered edge of the smear. If suspected, the sample is recollected in citrate anticoagulant and rechecked [1].
Glossary of Related Medical Terms
- Anticoagulant: A substance that prevents blood from clotting. EDTA is standard for hematology testing.
- Artifact: A change in cell appearance caused by handling or processing, not by disease.
- Crenation: Spiky projections on red blood cells caused by slow drying or aged EDTA blood.
- EDTA: Ethylenediaminetetraacetic acid. The standard hematology anticoagulant. It binds calcium so blood does not clot.
- Feathered edge: The thin, tapering tail of the smear, where cells are spread in a single layer.
- Hematocrit: The percentage of blood volume made up of red cells.
- Inclusion body: An abnormal structure inside a blood cell, often seen in infection or inherited disease.
- Monolayer / zone of morphology: The single-cell-thick area of the smear where cells can be reliably evaluated.
- Pseudothrombocytopenia: A falsely low platelet count caused by EDTA-induced platelet clumping, not a true deficiency.
- Romanowsky stain: The family of stains (Wright, Giemsa, Leishman, May-Grünwald) used to color blood cells for microscopy.
- Wedge technique: The manual smear method using a spreader slide held at an angle.
Disclaimer: This protocol is for educational purposes only. Local laboratory standard operating procedures take precedence. It is not intended to be a substitute for informed professional medical advice, diagnosis, or treatment. Always consult a qualified healthcare professional for clinical decision-making. While the information presented here is derived from credible medical sources and is believed to be accurate and up-to-date, it is not guaranteed to be complete or error-free. See additional information.
References
- Bain, B. J. (2022). Blood cells: A practical guide (6th ed.). Wiley-Blackwell.
- Bain, B. J., Bates, I., & Laffan, M. A. (2017). Dacie and Lewis practical haematology (12th ed.). Elsevier.
- Adewoyin, A. S., & Nwogoh, B. (2014). Peripheral blood film - a review. Annals of Ibadan postgraduate medicine, 12(2), 71–79.
- Barnes, P. W., McFadden, S. L., Machin, S. J., Simson, E., & international consensus group for hematology (2005). The international consensus group for hematology review: suggested criteria for action following automated CBC and WBC differential analysis. Laboratory hematology : official publication of the International Society for Laboratory Hematology, 11(2), 83–90.
- Clinical and Laboratory Standards Institute. (2007). Reference leukocyte (WBC) differential count (proportional) and evaluation of instrumental methods; approved standard (2nd ed., CLSI document H20-A2). CLSI.
- Houwen B. (2002). Blood film preparation and staining procedures. Clinics in laboratory medicine, 22(1), 1–v. https://doi.org/10.1016/s0272-2712(03)00064-7
- Briggs, C., Longair, I., Slavik, M., Thwaite, K., Mills, R., Thavaraja, V., Foster, A., Romanin, D., & Machin, S. J. (2009). Can automated blood film analysis replace the manual differential? An evaluation of the CellaVision DM96 automated image analysis system. International journal of laboratory hematology, 31(1), 48–60. https://doi.org/10.1111/j.1751-553X.2007.01002.x